There’s something incredibly comforting about chocolate. Its rich, creamy texture and deep flavor can turn any moment into a cozy, indulgent experience. I still remember the first time I attempted to make a delightful chocolate treat at home. I was in my little kitchen, equipped with enthusiasm and a few ingredients, but with a bit of hesitation. Would my creation turn into a gooey mess or a heavenly dessert? Spoiler alert: it was the latter, but it didn’t come without its fair share of trial and error.
As a beginner home cook, it’s easy to feel overwhelmed. You might worry about ruining the dish, feeling unsure about every step. You could find yourself staring at a grocery list and wondering what on earth some of these ingredients even are! The fear of making a mistake can loom large, especially in the realm of desserts. I completely understand. However, I want to assure you that by following this guide, preparing your very own Dairy-Free Chocolate Creami will be not just easy and stress-free but also super rewarding—even for first-timers.
Let’s embrace that sweet tooth together!
TABLE OF CONTENTS
Ingredients You’ll Need for Dairy-Free Chocolate Creami Recipe
Before we dive into the recipe, let’s gather everything you’ll need to create this delicious Dairy-Free Chocolate Creami. Here’s the breakdown:
Essentials
1 cup (240g) cashew milk (or almond milk)
A creamy base is essential for our Dairy-Free Chocolate Creami. Cashew milk adds richness, while almond milk offers a lighter touch. Either option works beautifully!1/2 cup (120g) full-fat coconut milk
The star of our creamy texture! This adds a velvety richness to our treat. If you’re in a pinch, you can substitute this with dairy-free yogurt or a Nutpod for a similar consistency.2 scoops (40g) chocolate protein powder
This ingredient enhances the cocoa flavor while providing a nutritional boost. You can choose your favorite type; just make sure it’s delicious!2-3 (65g) pitted medjool dates
These natural sweeteners not only sweeten our cream but also help to keep it creamy. If you don’t have medjool dates, other sweeteners can work here, but I highly recommend these for the texture they provide.2 tbsp (12g) cocoa powder
Add a deeper, chocolatey flavor with this ingredient! This ensures our cream has the rich chocolate taste that we’re craving.1/8 tsp salt
Just a pinch! Salt enhances all the sweet flavors and balances the richness.1/2 tsp vanilla extract
This is the magic touch that brings all the flavors together.
Optional Add-Ons
- 1 tbsp (16g) Chocolate SunButter, peanut butter, or tahini
If you want to take it to the next level, a drizzle of one of these nut or seed butters can add a delightful creaminess and flavor.
Substitutions and Shortcuts
- Milk Alternatives: If you don’t have cashew or almond milk, feel free to use any other nut milk or oat milk.
- Sweeteners: Brown sugar or maple syrup can be used instead of medjool dates if you’re in a hurry, just be mindful of texture changes.
- Protein Powder: Any flavor of protein powder can work. Try vanilla for a different twist!
With our ingredient list in hand, you’re ready to start this chocolatey adventure!
Print
Dairy-Free Chocolate Creami
- Total Time: 1440 minutes
- Yield: 4 servings 1x
- Diet: Dairy-Free, Vegetarian
Description
A creamy and indulgent dairy-free dessert made with rich chocolate flavors and healthy ingredients.
Ingredients
- 1 cup (240g) cashew milk (or almond milk)
- 1/2 cup (120g) full-fat coconut milk
- 2 scoops (40g) chocolate protein powder
- 2–3 (65g) pitted medjool dates
- 2 tbsp (12g) cocoa powder
- 1/8 tsp salt
- 1/2 tsp vanilla extract
- 1 tbsp (16g) Chocolate SunButter, peanut butter, or tahini (optional)
Instructions
- Blend all the ingredients in a blender until smooth and velvety.
- Pour the mixture into a Ninja Creami container, leaving some space at the top, and seal it. Freeze overnight.
- Remove the container from the freezer and process it in the Ninja Creami machine on the light ice cream setting.
- If the consistency is too thick, add a splash of milk and re-spin until creamy.
- Mix in any additional desired ingredients and enjoy immediately or store for later.
Notes
Be careful not to overfill the Ninja Creami container and ensure that all ingredients are well blended for the best texture.
- Prep Time: 10 minutes
- Cook Time: 0 minutes
- Category: Dessert
- Method: Freezing, Blending
- Cuisine: American
Nutrition
- Serving Size: 1 serving
- Calories: 250
- Sugar: 15g
- Sodium: 200mg
- Fat: 16g
- Saturated Fat: 10g
- Unsaturated Fat: 6g
- Trans Fat: 0g
- Carbohydrates: 24g
- Fiber: 5g
- Protein: 8g
- Cholesterol: 0mg
Keywords: dairy-free, dessert, chocolate, creamy, healthy treats, homemade ice cream
How to Make Dairy-Free Chocolate Creami Recipe Step-by-Step
The process of making the Dairy-Free Chocolate Creami is straightforward and just requires a few simple steps. Gather your ingredients, and let’s get blending!
Step 1: Blend All the Ingredients
Start by adding all of your ingredients into a blender. This includes the cashew milk, full-fat coconut milk, chocolate protein powder, pitted medjool dates, cocoa powder, salt, and vanilla extract. Blend on high until the mixture is smooth and well-combined. You’re looking for a velvety consistency that speaks to the creamy nature of ice cream.
Step 2: Freeze in a Ninja Creami Container
Once everything is blended to perfection, pour the mixture into a Ninja Creami container. It’s important to leave some space at the top, as the mixture will expand while freezing. Seal that lid tight and place it in the freezer. Patience is key here—freeze it overnight for the best results!
Step 3: Process on the Light Ice Cream Setting
The next day, it’s time for the magic to happen! Remove your frozen mixture from the freezer and place it in your Ninja Creami machine. Turn it on and select the “light ice cream” setting. At this stage, your creation will likely come out a bit powdery, but don’t fret; it’s all part of the process.
Step 4: Add Milk and Re-Spin
If the consistency isn’t quite where you want it to be, pour a splash of milk, preferably coconut, over the top of your mixture. You’ll then want to re-spin it once or twice to achieve that creamy, soft-serve texture. The key is to take it slow and check as you go.
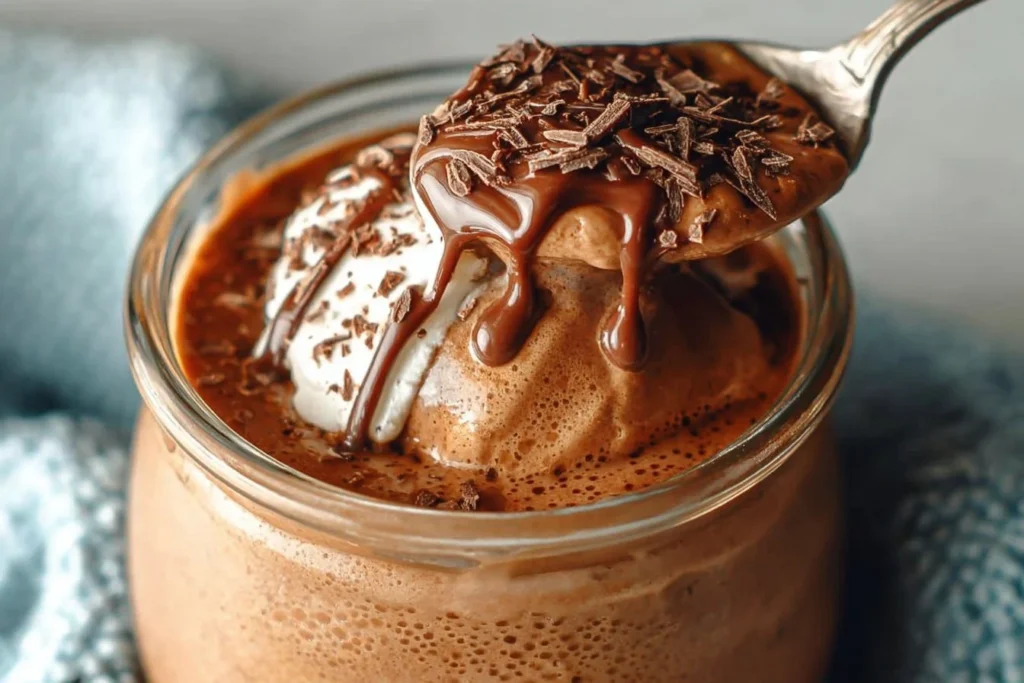
Step 5: Mix in Extras and Enjoy!
Now comes the fun part! You can add mix-ins like chocolate chips, nuts, or more of your favorite butters at this stage. Process on the “mix-in” setting until everything is well incorporated. Scoop it into a bowl or cup, and there you have it—a delicious, homemade Dairy-Free Chocolate Creami! Enjoy it immediately or store it for future indulgence.
interested in more frozen desserts? I invite you to read the list of 16 Best Iced Coffee Recipes, 15 Kid-friendly Ice Cream ideas, or the Ninja Creami recipes.
Common Mistakes to Avoid
While making this delicious Dairy-Free Chocolate Creami is pretty straightforward, it’s always good to be aware of common pitfalls. Here are a few to watch out for:
Not Blending Enough
One frequent mistake beginners make is not blending the mixture until it is fully smooth. You might think it’s good enough just because there aren’t visible chunks, but you want a truly silky mixture. If it’s chunky, it won’t freeze well, and you’ll miss out on that creamy texture.
Overfilling the Container
Another error is overfilling the Ninja Creami container. Liquid expands when frozen. If you’ve filled it to the brim, you might end up with a mess instead of a solid dessert. Leave a little space at the top to prevent any spillage!
Ignoring the Freezing Time
Patience is key when it comes to frozen desserts. If you pull the container out after only a few hours, you won’t get the proper texture and consistency. Stick with freezing it overnight for the best outcome.
Skipping the Re-Spin
It might be tempting to skip the re-spin step, especially if you feel busy, but this is crucial for turning that initial powdery output into a creamy delight. Don’t rush this step!
Quick Wins for Beginner Cooks
Even if you’re new to the kitchen, here are some quick wins that can help you master this recipe:
Gather Your Ingredients Ahead of Time
Before you start, take a moment to lay out all your ingredients. This will help you feel organized and confident about the steps ahead. Plus, it makes the cooking process much smoother!
Measure Wisely
Measuring may seem tedious, but it’s kind of like following a treasure map. Making sure you get the precise amounts will yield the best results. Use dry measuring cups for powders and a liquid measuring cup for your milks to ensure accuracy.
Taste As You Go
This isn’t just about following steps; it’s about making something you enjoy. Taste the mixture before you freeze it—does it need a touch more cocoa? A drizzle of sweetener? Adjust it to your liking!
Use Fresh Ingredients
When it comes to non-dairy milks and other ingredients, freshness matters. Using things that are nearing their expiration won’t give you the best flavors. When in doubt, quality always triumphs.
Pro-Level Tips for When You’re Ready
Once you’ve mastered the basic recipe, here are a few pro-level tips to enhance your Dairy-Free Chocolate Creami:
Experiment with Flavors
Why not try different flavor combinations? Swap out chocolate protein powder for vanilla and add in fresh berries or nuts for a fruity twist. The possibilities are truly endless!
Try Different Mix-ins
Get creative with your add-ins. When processing your Dairy-Free Chocolate Creami, consider adding granola, coconut flakes, or even a spoonful of instant coffee for a mocha vibe. Your taste buds will thank you!
Use a High-Powered Blender
If you have access to a high-powered blender, use it! These blenders blend everything to a dreamy smooth texture very quickly, saving you time and potential frustration.
Store Properly to Maintain Freshness
If you have leftovers (which is rare, by the way!), store your Dairy-Free Chocolate Creami in an airtight container in the freezer. To enjoy it later, simply let it sit at room temperature for a few minutes before scooping!
Conclusion
And there you have it—your cozy, homemade Dairy-Free Chocolate Creami that looks and tastes indulgent but is totally beginner-approved! By following along, you’ve learned that this creamy dessert is easier than it seems. You can customize every bite to match your taste, making it a delightful treat any time you crave something sweet.
Now, you might want to invite some friends over to share your creation or enjoy it while snuggled up on the couch with a movie. Whatever you choose, savor every creamy, chocolate-filled moment. If you enjoyed this recipe, I encourage you to try different flavors or get creative with your mix-ins.
Don’t forget to share your experience! I’d love to hear how your Dairy-Free Chocolate Creami turned out and any twists you added. Let’s keep the conversation going—join our community of fellow home cooks and bring your creations to life!
Looking for more delicious recipes? Follow us on Pinterest and Facebook!
FAQs About Dairy-Free Chocolate Creami Recipe
What is a Dairy-Free Chocolate Creami Recipe?
It’s a delicious frozen dessert made without dairy, combining healthy ingredients like cashew milk, coconut milk, and chocolate protein powder for a creamy and indulgent experience.
Can I use other types of milk in this Dairy-Free Chocolate Creami Recipe?
Absolutely! You can easily substitute almond milk, oat milk, or any other plant-based milk that you prefer.
How long do I need to freeze the Dairy-Free Chocolate Creami Recipe?
For optimal results, freeze the mixture in the Ninja Creami container overnight before processing.
Can I make the Dairy-Free Chocolate Creami Recipe without protein powder?
Yes! You can skip the protein powder; however, it does contribute to the overall flavor and texture, so consider adding an extra touch of cocoa powder or a sweetener to maintain sweetness.
What are some fun mix-ins I can add to my Dairy-Free Chocolate Creami?
You can add chocolate chips, nuts, fresh fruit, or even a swirl of your favorite nut butters for an extra flavor boost!