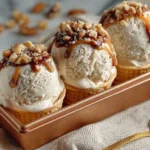
Ice Cream Cone Cupcakes are a delightful twist on traditional cupcakes that bring a touch of whimsy and joy to the dessert table. Imagine the deliciousness of chocolate cake snugly fitting inside a crispy cone, topped with fluffy vanilla frosting that looks just like soft-serve ice cream. This fun dessert is perfect for birthday parties, summer barbecues, or any occasion that calls for something sweet and playful. Not only do they taste amazing, but they are also visually appealing, making them a hit with both kids and adults alike.
Highlights
Why You’ll Love This Ice Cream Cone Cupcake
What’s not to love about Ice Cream Cone Cupcakes? They combine two beloved treats: cupcakes and ice cream cones! Every bite feels like a mini celebration. They are easy to make, require minimal ingredients, and allow for incredible creativity in decorating. The cones are easy to hold, making them a mess-free option for parties and gatherings. Whether you opt for chocolate, vanilla, or even red velvet, these cupcakes ensure that each bite is full of flavor. Plus, they are perfect for those who want to enjoy dessert on the go.
Ingredients You’ll Need for Ice Cream Cone Cupcakes:
To bake this marvelous treat, gather the following ingredients:
- 12 ice cream cones: The classic wafer ones work best, but feel free to use sugar cones for a sweeter twist.
- 1 box chocolate cake mix: This will be the base of our cupcakes. Choose your favorite brand or flavor.
- Ingredients necessary for cake preparation: This usually includes water, eggs, and oil as per the instructions on your cake mix box.
- Vanilla frosting: This will serve as the “ice cream” topping. You can either buy it or make it from scratch.
Optional Add-Ons:
- Sprinkles: Add a pop of color or fun with your favorite sprinkles.
- Chocolate sauce or syrup: Drizzle on top for a rich and decadent touch.
- Cherries or small candies: A cherry on top makes it feel extra special.
How to Make Ice Cream Cone Cupcakes – Step by Step
Creating your Ice Cream Cone Cupcakes is straightforward and fun. Just follow these detailed steps:
Preheat the Oven: Start by preheating your oven according to the instructions on the cake mix box. This usually means setting it to 350°F (175°C), but always check the box for specifics.
Prepare Muffin Molds: To keep your ice cream cones steady while baking, place them upright in muffin tins. If you don’t have enough of these tins, you can use a baking sheet to ensure they don’t tip over.
Mix the Cake Batter: Follow the instructions on your cake mix box. Usually, this involves combining the cake mix with water, eggs, and oil in a mixing bowl. Use a whisk or an electric mixer to combine until you have a smooth batter.
Fill the Cones: Pour the cake batter into each ice cream cone, filling them about two-thirds full. Be careful not to overfill, as the batter will rise while baking. If you want uniformity, you might use a measuring cup or a piping bag for this step.
Bake: Place the filled cones in the oven and bake them according to the timing suggested on the cake mix box (often around 18 to 22 minutes). Keep an eye on them; they are done when the tops spring back when lightly touched.
Cool Completely: Once baked, remove the cones from the oven and let them cool in the muffin tins for about 10 minutes before transferring them to a wire rack. Make sure they are completely cool before frosting.
Frosting Time: Once the cupcakes are cool, generously frost each cone with vanilla frosting. You can use a spatula for a smooth finish or a piping bag for a fun swirl that mimics soft-serve ice cream.
Decoration: Finally, add any toppings you desire – sprinkles, chocolate sauce, or a cherry on top. Get creative with your decorations for a personalized touch!
Serving Suggestions for Ice Cream Cone Cupcakes
Ice Cream Cone Cupcakes are delightful served as a fun centerpiece at parties, but they can be enjoyed in a variety of ways:
- Party Treats: Set them on a vibrant cake stand or platter for an eye-catching dessert display at birthday parties or family gatherings.
- Picnic Essentials: They are ideal for outdoor activities since they are easy to transport and don’t require plates or utensils.
- Dessert Stations: Consider setting up a cupcake bar where guests can decorate their cones with various toppings.
- Gift Ideas: Wrap a few in clear cellophane and tie them with a ribbon for a charming homemade gift.
Ice Cream Cone Cupcakes
- Total Time: 37 minutes
- Yield: 12 servings 1x
- Diet: Vegetarian
Description
Delightful ice cream cone cupcakes that combine chocolate cake with fluffy vanilla frosting, perfect for parties and celebrations.
Ingredients
- 12 ice cream cones
- 1 box chocolate cake mix
- Ingredients necessary for cake preparation (water, eggs, and oil)
- Vanilla frosting
- Optional add-ons: sprinkles, chocolate sauce, cherries
Instructions
- Preheat the oven according to the cake mix instructions (usually 350°F / 175°C).
- Prepare muffin molds by placing the ice cream cones upright in muffin tins or a baking sheet.
- Mix the cake batter following cake mix instructions, combining cake mix with water, eggs, and oil.
- Fill each cone about two-thirds full with the cake batter.
- Bake according to cake mix timing, usually around 18 to 22 minutes, until the tops spring back.
- Remove from oven and cool in muffin tins for 10 minutes before transferring to a wire rack.
- Once cool, frost each cone with vanilla frosting.
- Decorate with optional toppings like sprinkles, chocolate sauce, or a cherry.
Notes
Ensure cupcakes are completely cool before frosting to prevent melting.
- Prep Time: 15 minutes
- Cook Time: 22 minutes
- Category: Dessert
- Method: Baking
- Cuisine: American
Nutrition
- Serving Size: 1 cupcake
- Calories: 250
- Sugar: 20g
- Sodium: 150mg
- Fat: 10g
- Saturated Fat: 3g
- Unsaturated Fat: 7g
- Trans Fat: 0g
- Carbohydrates: 35g
- Fiber: 1g
- Protein: 3g
- Cholesterol: 40mg
Keywords: ice cream cone cupcakes, dessert, party treats, baking, fun dessert
Pro Tips for Perfecting Your Ice Cream Cone Cupcakes
Choose Quality Ingredients: Always opt for high-quality cake mix and frosting. It makes a difference in taste!
Don’t Overfill: Filling only two-thirds full is crucial. If you overfill, you risk having a mess in your oven and cupcakes that overflow from the cones.
Check for Doneness: Each oven is different. Check your cupcakes a few minutes before the recommended time to avoid overbaking.
Cool Thoroughly: Ensure the cone cupcakes are fully cool before frosting. If they are warm, it can melt the frosting.
Get Creative: Have fun with the decoration! Use different types of frosting or try different flavored cake mixes.
Easy Variations for Ice Cream Cone Cupcakes
Ice Cream Cone Cupcakes are highly versatile! Here are a few fun variations to consider:
Flavor Swaps: Use a vanilla or red velvet cake mix for a different flavor profile. You can even use gluten-free mixes for a gluten-free option.
Frosting Flavors: Instead of vanilla frosting, try chocolate, strawberry, or whipped cream to elevate the flavor.
Themed Toppers: For holidays or special occasions, customize the toppings. Use red and green sprinkles for Christmas or pastel colors for Easter.
Stuffed Cone Cupcakes: Add a surprise in the center! Place a small candy or a dollop of jam in the middle of the batter before baking.
Dairy-Free Option: Look for dairy-free cake mixes and frostings to accommodate lactose-intolerant guests or vegans.
Storage Tips to Store Ice Cream Cone Cupcakes
If you happen to have leftovers (though they may not last long!), here’s how to store them properly:
Room Temperature: If you plan to consume them within a couple of days, store your cupcakes at room temperature in an airtight container. Be careful not to stack them; the frosting can be a bit messy!
Refrigerate: If you need to store them for longer, keep the cupcakes in the refrigerator. Place them in a container to prevent them from drying out.
Freeze: For longer storage, you can freeze the ungarnished cupcakes. Wrap each cone tightly in plastic wrap and place them in a freezer-safe bag. Thaw in the refrigerator before frosting and serving.
Conclusion
Ice Cream Cone Cupcakes are not just delicious; they are a joyous treat that brings smiles all around. With a basic cake mix, some ice cream cones, and frosting, you can create this nostalgic dessert that’s perfect for any occasion. So, put on your apron, gather your ingredients, and let’s create some fun in the kitchen! The end result will not just satisfy your sweet tooth but also fuel your creativity while decorating.
FAQs About Ice Cream Cone Cupcakes
1. Can I make these cupcakes ahead of time?
Yes, you can make Ice Cream Cone Cupcakes in advance. They can be stored at room temperature for a couple of days or in the refrigerator for up to a week. Just add the frosting and toppings before serving for the freshest taste.
2. How do I prevent the cones from tipping over in the oven?
Using muffin tins to hold the cones while baking is a great way to keep them steady. If you don’t have enough, you can also use a baking sheet with crumpled aluminum foil to create small pockets to hold them upright.
3. Can I use different types of cake mix?
Absolutely! Feel free to use any flavor of cake mix you like, such as vanilla, red velvet, or even lemon. The goal is to create a combination you and your guests will enjoy.
4. Can I freeze leftover Ice Cream Cone Cupcakes?
Yes, you can freeze the cupcakes without frosting. Wrap them tightly in plastic wrap and store them in a freezer-safe bag. Just remember to frost them after thawing for the best flavor.
5. What can I do if my frosting melts?
If your frosting is melting, it might be due to warm cupcakes or a hot room temperature. Let the cupcakes cool completely before frosting, and consider refrigerating the frosted cupcakes for a short time to set the frosting before serving.
Now you’re ready to make your own Ice Cream Cone Cupcakes and enjoy every moment from mixing the batter to savoring the sweet results. Happy baking!