I can still remember the first time I craved something creamy and simple after a long winter walk — that sticky-sweet, cold comfort that felt like a hug in a glass. If you’re new to the Ninja Creami, it can feel a little intimidating at first — how long do you freeze, which setting do you choose, will it be too icy? I promise this Ninja Creami Vanilla Bean Milkshake is one of the friendliest recipes to start with: short ingredient list, predictable results, and very little cleanup. If you want a quick bit of nostalgia without fuss, this recipe will get you there easily, and you can even peek at a visual guide to a similar creamy vanilla idea here: Creamy Vanilla Bliss milkshake story.
Highlights
A Quick Look at This Ninja Creami Vanilla Bean Milkshake Recipe
This Ninja Creami Vanilla Bean Milkshake is a comforting treat that can also fit into a mindful eating plan when made intentionally. It delivers calcium and vitamin D from dairy (milk and ice cream), and a modest amount of protein that helps round out the snack. Depending on the ice cream you choose, you can control sugar and fat levels — picking a lower-sugar or higher-protein ice cream will push this toward a lighter, more balanced option. This recipe is naturally wholesome when you select thoughtful ingredients, and it works well as a smaller indulgence after a balanced meal or as a satisfying treat during meal prep weekends.
Ingredients You’ll Need for Ninja Creami Vanilla Bean Milkshake
Essentials
- 2 1/4 cups vanilla ice cream — choose a version that fits your goals: regular for classic richness, lower-sugar or higher-protein for a lighter option. Look for an ingredient list you recognize.
- 1 teaspoon vanilla bean paste — this adds flecks of real vanilla and a stronger vanilla flavor than plain extract.
- 3/4 cup milk — any milk you prefer: whole milk for creaminess, 2% or skim for fewer calories, or unsweetened plant milks if you’re dairy-free (note: texture changes slightly with plant milks).
- Whipped cream — optional for topping; use a light or coconut-based whipped cream for dairy-free diets.
Optional add-ons
- A scoop of vanilla or plain protein powder (if you want to boost protein).
- A pinch of sea salt or a small pinch of ground cinnamon to lift flavors.
- Fresh fruit like sliced bananas or berries for a fruitier spin.
- A small spoon of nut butter for extra richness and healthy fats.
If you want to explore a chocolate twist as inspiration, I’ve enjoyed experimenting with a chocolate version and you can find notes on how flavor swaps behave here: chocolate milkshake variation.
Substitutions and shortcuts
- Dairy-free: Use a full-fat coconut milk ice cream and unsweetened almond or oat milk; this keeps a creamy mouthfeel while avoiding dairy.
- Lower sugar: Use a lower-sugar vanilla ice cream and unsweetened milk, or try a naturally sweetened frozen yogurt alternative.
- Higher protein: Swap in a higher-protein frozen dessert or stir a scoop of protein powder into the milk before creaming.
- Quick cheat: If you don’t have vanilla bean paste, use 3/4 to 1 tsp pure vanilla extract. Paste gives those little black specks and a richer vanilla aroma, but extract still works in a pinch.
- Make it thick or thin: Adjust milk between 1/2 and 1 cup based on how thick you like shakes. Less milk = thicker shake.
How to Make Ninja Creami Vanilla Bean Milkshake Step-by-Step
I like to keep the process approachable because the Ninja Creami does so much of the heavy lifting. Here’s how I make a smooth, scoopable shake that tastes like a small celebration.
- Prep the pint: Scoop 2 1/4 cups of vanilla ice cream into the Ninja Creami pint. Smooth the top with a spatula so the surface is even; this helps the machine do its work uniformly.
- Add the vanilla bean: Spoon in 1 teaspoon of vanilla bean paste onto the ice cream. Those tiny seeds give a real vanilla aroma and visual charm.
- Pour the milk: Add 3/4 cup milk directly to the pint. If you’re boosting protein, dissolve a scoop of protein powder in the milk first to avoid clumps.
- Freeze firmly: Seal the pint with the lid and freeze upright for at least 24 hours. For best texture, I always keep it for 24 hours so the ice cream is fully solid — this helps the Creami spin up a smooth milkshake rather than a slushy.
- Set up the Ninja Creami: Remove the frozen pint from the freezer. Remove the lid and place the pint into the outer bowl of the Ninja Creami machine. Lock the bowl into place according to your machine’s instructions.
- Select the milkshake program: I set the machine to the “Milkshake” setting and let it complete the cycle. The Creami will spin and blend the frozen base into a creamy, uniform texture.
- Re-spin if necessary: If the milkshake looks a little crumbly or too thick, use the “Re-spin” or the “Mix-In” function for short bursts until you reach your desired texture. Add a splash of milk between spins if it seems too dense; I add a tablespoon at a time to preserve creaminess without diluting flavor.
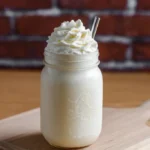
- Serve: Pour into two small glasses or one large glass. Top with a dollop of whipped cream if you like, maybe a sprinkle of vanilla bean or a light dusting of cinnamon, and enjoy immediately.
Tips to preserve nutrients and texture:
- Use cold milk straight from the fridge rather than warm; this keeps the ice cream from melting too quickly and preserves a creamy texture without thinning.
- If adding protein powder, choose unflavored or vanilla whey/plant powder and dissolve it into the milk first to reduce clumping — this maximizes protein uptake and gives a smoother mouthfeel.
- Avoid overworking the spin cycle with hot or room-temperature ingredients; the Creami is designed for frozen pints, so keep things cold for the best result.
For general machine tricks and care, I often refer to practical Ninja Creami tips that helped speed up my learning curve: Ninja Creami tips.

Common Mistakes to Avoid
Even the simplest milkshake can go sideways if you don’t watch a few small details. Below are the common traps I see and how to avoid them so your Ninja Creami Vanilla Bean Milkshake comes out just right.
Mistake 1: Skipping the proper freeze time
If the pint isn’t frozen solid for the recommended 24 hours, the Creami won’t be able to create a smooth milkshake texture. You’ll end up with a slushy or a product that’s too soft. Freeze the pint fully and make this part non-negotiable.
Mistake 2: Adding too much milk at once
When you add too much milk before or during processing, the shake can become watery. Start with the recommended 3/4 cup, and if you need to thin it, add milk a tablespoon at a time between re-spins. It’s easier to thin than to thicken.
Mistake 3: Over-relying on flavor extracts without textures
Using only vanilla extract without considering the base can lead to a milkshake that tastes flat. I prefer vanilla bean paste for both aroma and visual appeal; also consider a pinch of salt or a small bit of cinnamon to elevate the natural flavors.
Serving Suggestions for Ninja Creami Vanilla Bean Milkshake
A milkshake is comforting on its own, but there are lovely ways to serve it that keep things health-conscious and satisfying. I like to think of serving as an opportunity to balance indulgence with nutrition.
I often pair my shake with a small protein-rich snack or a light salty bite so the treat feels like part of a balanced mini-meal. If you want inspiration for pairing or styling, there are fun variations to try based on stories and experiments that inspired me: my chocolate milkshake adventure.
Pair with small protein bites
Serve the milkshake with a handful of roasted almonds, a small slice of whole-grain toast with nut butter, or a boiled egg if you want a protein boost. This balances the sugars in the shake and helps you stay satisfied longer.
Lighter dessert plating
If you’re treating this as dessert, portion it smaller (one small glass) and add fresh berries on top rather than heavy syrup — berries add fiber and antioxidants with minimal sugar.
Make it brunch-friendly
Turn the milkshake into a brunch treat by serving alongside a mini spinach and feta omelet or a whole-grain waffle topped with fresh fruit. The creamy sweetness of the shake complements savory brunch flavors beautifully.
Conclusion
I’ve found the Ninja Creami Vanilla Bean Milkshake to be one of those small pleasures that’s easy to tailor to your goals — switch the base, nudge the milk amount, or add protein and it becomes a mindful treat rather than a sugar splurge. It’s flexible, practical for busy days, and reliably comforting when I want something creamy without a long recipe. If you’d like to compare technique or try another version from a trusted source, I recommend checking out the A Taste of Madness write-up for extra inspiration: Ninja Creami Vanilla Bean Milkshake | A Taste of Madness. Give this recipe a try and tell me which tweak you loved most — I’m always curious how people make it their own.
FAQs About Ninja Creami Vanilla Bean Milkshake
Q1: Can I make the Ninja Creami Vanilla Bean Milkshake dairy-free?
A1: Yes. Use a dairy-free vanilla ice cream (coconut milk or oat-based are great) and an unsweetened plant milk such as almond or oat. Expect a slightly different texture — coconut-based ice creams tend to be creamier, while lighter plant milks may yield a less dense shake. Freeze thoroughly for best results.
Q2: How long should I freeze the pint before making the Ninja Creami Vanilla Bean Milkshake?
A2: Freeze the filled pint upright for at least 24 hours. Full freeze is important so the Creami can spin the frozen block into a smooth milkshake. Shorter freeze times usually produce slushier textures.
Q3: Can I add protein to the Ninja Creami Vanilla Bean Milkshake without changing the texture?
A3: Yes — gently. Dissolve a scoop of protein powder into the milk before adding it to the pint to reduce clumping. If the shake becomes too thick after creaming, add milk one tablespoon at a time and re-spin until you reach the desired consistency.
Q4: Is the Ninja Creami Vanilla Bean Milkshake suitable for meal prep?
A4: It’s best enjoyed fresh after processing; texture is best right away. However, you can prepare multiple pints in advance and freeze them; then spin each when you’re ready to serve. That makes it a convenient, quick option for planned treats.
Q5: How can I make the Ninja Creami Vanilla Bean Milkshake lower in sugar?
A5: Choose a lower-sugar or naturally sweetened vanilla ice cream and use unsweetened milk. You can also reduce the amount of added sweet toppings and finish with a sprinkle of cinnamon or vanilla bean instead of syrup. These small swaps lower overall sugar without sacrificing the creamy experience.
Ninja Creami Vanilla Bean Milkshake
- Total Time: 1450 minutes
- Yield: 2 servings 1x
- Diet: Vegetarian
Description
A creamy and comforting vanilla milkshake using the Ninja Creami, perfect for a nostalgic treat or mindful indulgence.
Ingredients
- 2 1/4 cups vanilla ice cream
- 1 teaspoon vanilla bean paste
- 3/4 cup milk
- Whipped cream (optional topping)
- A scoop of protein powder (optional)
- A pinch of sea salt or ground cinnamon (optional)
- Fresh fruit (optional)
- A small spoon of nut butter (optional)
Instructions
- Scoop 2 1/4 cups of vanilla ice cream into the Ninja Creami pint and smooth the top with a spatula.
- Spoon in 1 teaspoon of vanilla bean paste onto the ice cream.
- Add 3/4 cup milk to the pint.
- Seal the pint with the lid and freeze upright for at least 24 hours.
- Remove the frozen pint and place it into the outer bowl of the Ninja Creami machine.
- Select the “Milkshake” setting and let the cycle complete.
- If the milkshake looks crumbly, use the “Re-spin” or “Mix-In” function as needed.
- Pour into glasses, add toppings if desired, and enjoy.
Notes
For a thicker shake, adjust the milk between 1/2 and 1 cup based on your preference. Use cold milk to keep the texture creamy.
- Prep Time: 10 minutes
- Cook Time: 1440 minutes
- Category: Dessert
- Method: Blending
- Cuisine: American
Nutrition
- Serving Size: 1 serving
- Calories: 350
- Sugar: 28g
- Sodium: 150mg
- Fat: 20g
- Saturated Fat: 10g
- Unsaturated Fat: 8g
- Trans Fat: 0g
- Carbohydrates: 40g
- Fiber: 0g
- Protein: 8g
- Cholesterol: 75mg
Keywords: milkshake, vanilla, creamy dessert, Ninja Creami, easy recipes