
Who doesn’t love ice cream? It’s the ultimate comfort food—creamy, sweet, and downright delightful. But what if you could enjoy this indulgent treat while adding a healthy twist? That’s where our Peanut Butter Cup Protein Ice Cream comes in! Using a Ninja Creami, you can whip up this delicious ice cream with a kick of protein, making it a perfect post-workout treat or a guilt-free dessert. This recipe combines the rich flavors of peanut butter and chocolate, making for a satisfying ice cream experience without the usual calories.
Whether you’re looking to satisfy your sweet tooth after a hard workout or simply wanting to indulge in a homemade dessert, this protein-packed ice cream is your answer. Ready to create a creamy treat that combines health and flavor? Let’s dive into why you’ll love this recipe!
Highlights
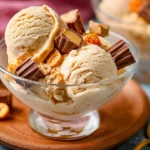
Peanut Butter Cup Protein Ice Cream
- Total Time: 1450 minutes
- Yield: 4 servings 1x
- Diet: High Protein
Description
A delicious and protein-packed ice cream made with peanut butter and chocolate, perfect for a post-workout treat or a guilt-free dessert.
Ingredients
- 1 ½ cups Whole Milk
- ¼ cup Powdered Peanut Butter
- 1 scoop Vanilla Protein Powder
- 1 Tbsp. Vanilla Pudding Mix
- Mini Reese’s Peanut Butter Cups (for garnish)
- Creamy Peanut Butter (1-2 Tbsp., optional)
- Reese’s Pieces (optional)
Instructions
- In a clean Ninja Creami pint, add the whole milk, powdered peanut butter, vanilla protein powder, and vanilla pudding mix.
- Whisk to combine the ingredients thoroughly.
- Transfer the pint to the freezer, lid off, and freeze for a full 24 hours.
- After freezing, place the pint in the Ninja Creami and secure the lid.
- Choose the ‘Lite Ice Cream’ setting and let it spin.
- Once mixed, create a small hole in the center and add mini peanut butter cups and creamy peanut butter.
- Run the mix-in program once to distribute the treats.
- Scoop out the ice cream and serve immediately.
Notes
Experiment with different protein powders and mix-ins to customize your ice cream.
- Prep Time: 10 minutes
- Cook Time: 1440 minutes
- Category: Dessert
- Method: Freezing
- Cuisine: American
Nutrition
- Serving Size: 1 serving
- Calories: 250
- Sugar: 10g
- Sodium: 200mg
- Fat: 10g
- Saturated Fat: 3g
- Unsaturated Fat: 5g
- Trans Fat: 0g
- Carbohydrates: 25g
- Fiber: 2g
- Protein: 12g
- Cholesterol: 15mg
Keywords: ice cream, protein, peanut butter, dessert, healthy treat
Why You’ll Love This Peanut Butter Cup Protein Ice Cream
- Healthy Twist: Packed with protein from the protein powder and healthy fats from peanut butter, this ice cream helps nourish your body while spoiling your taste buds.
- Customizable: With the option to add mix-ins like mini Reese’s Peanut Butter Cups or even Reese’s Pieces, you can easily adjust this delightful ice cream to suit your cravings.
- Quick and Easy: This recipe is straightforward, making it perfect for both beginners and expert cooks alike. You’ll be enjoying your own homemade ice cream in no time!
- Ninja Creami Magic: Using a Ninja Creami gives this ice cream its luscious texture. This gadget takes ice cream making to a new level, making it super easy to achieve that creamy consistency.
Ingredients You’ll Need for Peanut Butter Cup Protein Ice Cream
Creating this vibrant ice cream requires only a handful of ingredients, many of which you may already have in your pantry! Here’s what you’ll need:
Essential Ingredients
- Whole Milk (1 ½ cups): This creamy base creates a rich texture for the ice cream.
- Powdered Peanut Butter (¼ cup): Brands like PB2 work beautifully in this recipe, giving the ice cream that iconic peanut butter flavor without the added oil.
- Vanilla Protein Powder (1 scoop): This ingredient adds protein that contributes to muscle recovery, making it perfect for post-workout.
- Vanilla Pudding Mix (1 Tbsp.): This adds sweetness and helps create a creamy texture when frozen.
Optional Add-Ons
You can take your ice cream to another level with some fun mix-ins:
- Mini Reese’s Peanut Butter Cups (3 or more for garnish): These offer a delightful chocolate plus peanut butter surprise in every bite.
- Creamy Peanut Butter (1-2 Tbsp.): A swirl of peanut butter adds even more richness and flavor.
- Reese’s Pieces: For those who love an extra crunch and burst of chocolate.
How to Make Peanut Butter Cup Protein Ice Cream – Step by Step
Ready to create this delicious treat? Follow these detailed steps for the perfect Peanut Butter Cup Protein Ice Cream:
Mix the Base Ingredients: In a clean Ninja Creami pint, add 1 ½ cups of whole milk, ¼ cup of powdered peanut butter, 1 scoop of vanilla protein powder, and 1 tablespoon of vanilla pudding mix. This blend forms the creamy base of your ice cream.
Whisk: Use a whisk to combine the ingredients thoroughly. For a smooth texture, a milk frother can be a handy tool to whip everything together, ensuring there are no clumps.
Freeze: Transfer the pint to your freezer. Place it on a flat surface with the lid off to avoid a bump forming, which could ruin the mix-in process. Freeze for a full 24 hours for the best texture.
Assemble: After 24 hours, remove the pint from the freezer. Place it inside the outer bowl of the Ninja Creami. Secure the lid on the top and put the whole assembly on the motor base. Turn the handle to raise the platform and lock everything in place.
Spin it!: Choose the ‘Lite Ice Cream’ setting on the Ninja Creami and let it do its magic! There’s usually no need for a second spin; your ice cream should come out creamy and ready to enjoy.
Mix-ins: Use a spoon to carve out a small hole in the center of the ice cream—about 1½ inches wide. Drop in those mini peanut butter cups and a spoonful of creamy peanut butter at the center. Then, run the mix-in program just once to evenly distribute your delightful treats throughout the ice cream.
Enjoy: Once it’s mixed, remove the pint from the Ninja Creami. Scoop out your delicious Peanut Butter Cup Protein Ice Cream and top it with any additional mix-ins you’d like to add. Serve immediately and enjoy the rich, creamy goodness!
Serving Suggestions for Peanut Butter Cup Protein Ice Cream
This ice cream is perfect on its own, but if you want to elevate the experience further, consider the following serving suggestions:
- Toppings Galore: Add extra crushed mini Reese’s Peanut Butter Cups, chocolate syrup, or a sprinkle of crushed nuts for added texture.
- Serving Size: This ice cream can be served in bowls or cones. If you’re feeling adventurous, make an ice cream sandwich using your favorite cookies!
- Smoothie Base: Blend the ice cream with a splash of milk for a rich peanut butter smoothie that makes a great breakfast or snack.
Looking for more delicious recipes? you can check the list of Ninja Creami recipes, and remember to Follow us on Pinterest and Facebook!
Pro Tips for Perfecting Your Peanut Butter Cup Protein Ice Cream
- Chill Your Equipment: To ensure the best consistency, keep your Ninja Creami bowl in the freezer so it’s cold when you are ready to blend.
- Personalize Your Ice Cream: Don’t be afraid to experiment with flavors! Try adding other flavors of protein powder, or mix in dark chocolate chips for a different twist.
- Patience is Key: Letting the ice cream freeze for a full 24 hours is crucial. This time allows for the perfect creamy texture that you want when making the ice cream.
Easy Variations for Peanut Butter Cup Protein Ice Cream
Looking to switch things up? Here are some easy variations you can try:
- Chocolate Lovers: Swap out the vanilla protein powder for chocolate protein powder, and add a touch of cocoa powder for an extra chocolate boost.
- Nutty Variations: Stir in almond or cashew butter instead of peanut butter for a different, nutty flavor.
- Banana Peanut Butter: Add mashed ripe bananas (about half a banana) to your mix for a delightful banana peanut butter flavor. Just be sure to adjust the liquid slightly, if needed.
Storage Tips to Store Peanut Butter Cup Protein Ice Cream
To keep your ice cream fresh and delicious for longer:
- Airtight Containers: Store leftovers in an airtight container in the freezer. This prevents freezer burn and helps maintain the ice cream’s creamy texture.
- Label and Date: If you make a big batch, don’t forget to label the container with the date you made it. Enjoy it within a month for the best quality!
Conclusion
In just a few simple steps, you can create a delightful Peanut Butter Cup Protein Ice Cream that satisfies your cravings while also providing a healthy dose of protein. With the Ninja Creami, making this decadent treat can be a fun and rewarding experience! Whether you’re treating yourself after a workout, entertaining friends, or simply looking for an indulgent dessert, this ice cream is sure to impress.
So, grab your ingredients, and let the rich flavors of peanut butter and chocolate whisk you away on a delicious journey. Enjoy every creamy scoop, knowing it’s a treat that’s both delicious and nourishing!
FAQs About Peanut Butter Cup Protein Ice Cream
Can I use almond milk instead of whole milk?
Yes, almond milk can be used, but it may slightly alter the creaminess of the ice cream. Ensure you pick a creamier option for the best results.
What can I use instead of vanilla pudding mix?
If you don’t have vanilla pudding mix, you can omit it or use a cornstarch-based thickener. Just keep in mind, this could change the texture a bit.
How long can I store the ice cream?
Peanut Butter Cup Protein Ice Cream can last up to a month in the freezer. For optimal texture, consume it within two weeks.
Can I use regular peanut butter instead of powdered?
While you can, using regular peanut butter will change the consistency significantly by adding more fat, making it richer and a bit heavier.
Can this recipe be made dairy-free?
Absolutely! Use dairy-free milk, like coconut or oat milk, and a plant-based protein powder to adjust the recipe to a dairy-free version.
With this detailed guide, you’re all set to create, serve, and enjoy your very own Peanut Butter Cup Protein Ice Cream! Happy ice cream making!


2 thoughts on “Peanut Butter Cup Protein Ice Cream”