##Introduction
Do you ever get a late-night craving for something sweet and fruity but balk at the idea of hauling out an ice cream machine? I remember the first time I wanted fresh strawberry ice cream but didn’t own a maker — I improvised, made a mess, and learned a few tricks that saved me from ruined texture. If you feel nervous about whipping up frozen treats, you’re not alone; it can seem technical at first, but this recipe is foolproof and stress-free. I’ll walk you through making Swirled Strawberry Ice Cream Without an Ice Cream Maker with simple steps and cozy tips — and if you like quick dessert experiments, you might enjoy my Ninja Slushi chocolate milkshake adventure for more inspiration.
##A Quick Look at This Swirled Strawberry Ice Cream Without an Ice Cream Maker Recipe
This Swirled Strawberry Ice Cream Without an Ice Cream Maker is built on two star ingredients: cold thick whipping cream and sweetened condensed milk, accented with home-cooked strawberry puree. Its biggest benefit is convenience — no ice cream machine, no temperamental custard, and still delightfully creamy thanks to the whipped cream base. It’s an easy, forgiving recipe perfect for home cooks and beginners who want a homemade frozen treat with minimal fuss. Keep reading to learn how a handful of pantry staples and fresh berries transform into a gorgeous swirled ice cream that looks and tastes special.
##Ingredients You’ll Need for Swirled Strawberry Ice Cream Without an Ice Cream Maker
Essentials
- 500 ml (about 2 cups) thick whipping cream, well chilled — this is what gives the ice cream its creamy, airy texture.
- 397 g (one 14 oz can) sweetened condensed milk — provides sweetness and body without cooking a custard.
- 1 teaspoon pure vanilla extract — for a gentle warm note that balances the berries.
- 375 ml (about 1 1/2 cups) fresh strawberries, roughly 12 large berries, diced and divided (see below for how we split them).
- 80 ml (about 1/3 cup + 1 tsp) granulated sugar — to macerate and sweeten the strawberry puree.
Also useful:
- A 23 x 13 cm (9 x 5 inch) loaf pan for freezing the mixture.
- A hand blender or standard blender for making the strawberry puree.
- Electric hand mixer or stand mixer to whip the cream.
Optional add-ons
- A squeeze of lemon juice (1 teaspoon) to brighten the strawberry sauce.
- A pinch of sea salt to enhance the sweetness and flavor depth.
- Toasted almond slices, finely chopped cookies, or crushed graham crackers for texture swirls.
- Fresh mint leaves for serving (not mixed in; use as a garnish).
- A handful of freeze-dried strawberries crushed and sprinkled in for an intense strawberry punch.
Substitutions and shortcuts
- If you prefer a lower-fat option, try a light whipping cream, but expect a slightly less airy result.
- No fresh strawberries? Use frozen strawberries (thawed and drained) in the same volume; drain excess liquid before cooking with sugar.
- No sweetened condensed milk? You can make a quick substitute by simmering 2 cups (480 ml) whole milk with 2/3 cup (135 g) sugar and 4 tablespoons butter until thickened — but that’s more effort than most beginners want. Using canned sweetened condensed milk is the best shortcut.
- Short on time? Skip cooking the strawberries and mash them raw with sugar; you’ll get a fresher flavor but slightly chunkier texture and less thick syrup.
- If you don’t have vanilla extract, a split vanilla bean or 1/4 teaspoon vanilla powder will work in a pinch.
For more quick dessert ideas and simple shakes to pair with your ice cream, check out this easy Ninja Slushi vanilla protein milkshake recipe that’s great when you want something fast and frothy.
##How to Make Swirled Strawberry Ice Cream Without an Ice Cream Maker Step-by-Step
I’ll walk you through this as if we’re standing in the kitchen together. Take your time, and don’t rush the chilling steps — they make the biggest difference.
Prep your strawberries
- Wash and dry about 375 ml (roughly 12 large) strawberries. Cut them into small dice.
- Reserve 125 ml (about 1/2 cup) of the diced strawberries to fold into the ice cream later. The remaining 250 ml (about 1 cup) will be cooked into the strawberry sauce.
Cook the strawberry sauce
- Place the 250 ml diced strawberries and 80 ml granulated sugar in a small saucepan over low–medium heat.
- Cook gently for 8–10 minutes, stirring occasionally, until the strawberries are soft and the mixture becomes syrupy with a good amount of sauce.
- Taste and add a small squeeze of lemon juice (optional) if you want a bright lift.
- Remove the pan from the heat and let the sauce cool until it’s warm or cool to the touch (not steaming). This step prevents the heat from melting the whipped cream later.
Sweetened condensed milk and vanilla
- In a medium bowl, add 397 g sweetened condensed milk and 1 teaspoon vanilla extract.
- Stir until the vanilla is fully combined into the condensed milk. Set aside.
Puree the cooked strawberries
- Once the strawberry sauce is cool to the touch, use an immersion blender or regular blender to purée the cooked strawberries until smooth. If you like small bits of berry in your swirl, blend less; for a silky ribbon, blend until very smooth.
- Transfer the puréed sauce to a bowl and let it cool completely in the fridge if it’s still warm.
Whip the cream
- Chill a large mixing bowl (and beaters) in the fridge for 10–15 minutes. Cold equipment helps the cream whip better.
- Pour the 500 ml cold thick whipping cream into the chilled bowl. Use an electric mixer and whip until stiff peaks form. This is your base — don’t overbeat to butter, but firm stiff peaks are ideal.
Fold in the condensed milk mixture
- Gently fold the sweetened condensed milk and vanilla mixture into the whipped cream using a rubber spatula. Fold just until the two are combined — you want to keep as much air as possible in the cream.
Add the diced strawberries
- Gently fold the reserved 125 ml diced strawberries into the cream mixture. These provide fresh strawberry texture throughout the ice cream.
Layer into your loaf pan
- Pour about two-thirds of the cream mixture into a 23 x 13 cm (9 x 5 inch) loaf pan, smoothing the top lightly.
- Spoon the cooled strawberry purée over the cream layer in an even ribbon.
Create the swirl
- Top with the remaining cream mixture, smoothing gently.
- Take a knife, skewer, or chopstick and drag it through the purée layer several times to create a swirl pattern. Don’t overmix — a few graceful passes will create lovely ribbons without losing the swirl effect.
Freeze
- Cover the loaf pan with plastic wrap or a lid and place it in the freezer for at least 6 hours, preferably overnight. This helps the ice cream set firm and develop scoopable texture.
Serve
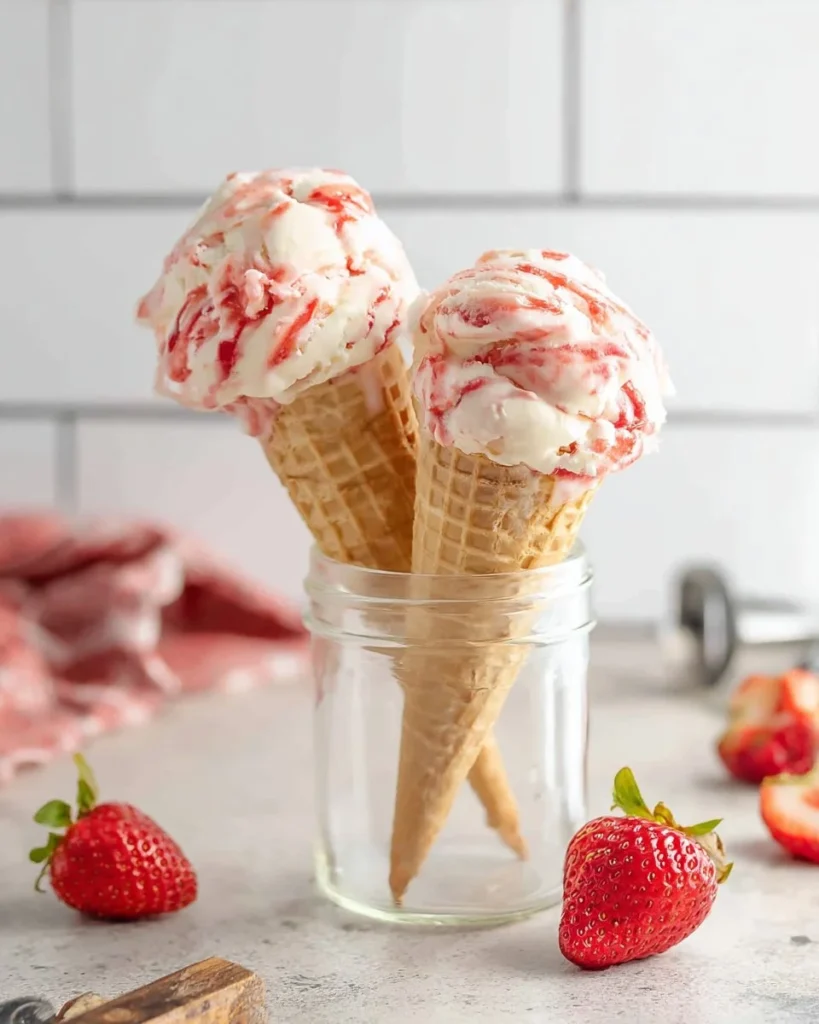
- When ready to serve, let the pan sit at room temperature for 5 minutes to loosen slightly, then scoop and enjoy. If the ice cream is extremely hard, let it thaw for a few extra minutes — patience yields smoother scoops.
A couple of extra notes: chilling the whipped cream bowl, using very cold cream, and allowing the strawberry purée to cool fully are the three small steps that make the texture much better. If you want extra guidance on recipe notes or substitutions, I keep a handy recipe notes and disclaimer page with general tips.
##Common Mistakes to Avoid
Making no-churn ice cream is wonderfully forgiving, but a few missteps can affect texture or flavor. Below are the most common pitfalls and what I do to prevent them.
Mistake 1: Using warm strawberry sauce
If the strawberry purée is still warm when you mix it into the cream, it can soften the whipped cream and make the mixture watery. Always let the sauce cool completely before swirling it into the cream.
Mistake 2: Overwhipping the cream
I know it’s tempting to see those beautiful peaks and keep going, but overwhipping turns cream grainy and eventually buttery. Stop whipping once you have stiff peaks — it should be glossy and hold shape.
Mistake 3: Skipping the chilling steps
Not chilling the mixing bowl and beaters, or starting with room-temperature cream, makes it much harder to reach the right peak stage. Pop your bowl and beaters in the fridge for 10–15 minutes; it’s an easy step that pays off.
##Serving Suggestions for Swirled Strawberry Ice Cream Without an Ice Cream Maker
This ice cream is pretty enough to serve on its own, but a few simple touches can make it feel extra special.
Fresh berries and mint
Top scoops with a few sliced fresh strawberries and a small sprig of mint for color and a fresh contrast.
Crumbled cookies or toasted nuts
A sprinkle of crushed shortbread cookies, graham crackers, or toasted almonds adds crunch and a buttery counterpoint to the creamy swirls.
Drizzle and sauces
A light drizzle of leftover strawberry sauce, warm chocolate sauce, or even a spoonful of jam warmed slightly and spooned over the top makes each scoop feel rooftop-café special.

##Conclusion
I love how this Swirled Strawberry Ice Cream Without an Ice Cream Maker feels like a small celebration made from everyday ingredients — rich whipped cream, sweet condensed milk, and sunny strawberries. It’s easier than it looks, totally customizable (add crunch, extra swirl, or a lemony brightness), and perfect for beginners who want a failproof frozen dessert. If you want to see a similar no-machine approach with a French twist, here’s a lovely reference I often look at: Crème glacée « magique » vanille-fraise sans sorbetière, en 5 …. Now, grab a spoon, pop a pan in the freezer, and let me know how your first batch turns out — I’m always happy to help troubleshoot or brainstorm flavor swaps.
##FAQs About Swirled Strawberry Ice Cream Without an Ice Cream Maker
Q1: Can I make Swirled Strawberry Ice Cream Without an Ice Cream Maker ahead of time for a party?
A1: Absolutely. This recipe freezes very well and can be made a day or two in advance. Keep it covered in the freezer to avoid absorbing other odors, and take it out 5–10 minutes before serving to soften slightly for easier scooping.
Q2: Can I use frozen strawberries to make Swirled Strawberry Ice Cream Without an Ice Cream Maker?
A2: Yes — frozen strawberries work fine. Thaw them and drain any excess liquid before cooking with sugar. You may need to simmer a little longer to reduce to a syrupy consistency.
Q3: How long will Swirled Strawberry Ice Cream Without an Ice Cream Maker keep in the freezer?
A3: Stored in an airtight container, it should keep well for 2–3 weeks with good texture. After that, ice crystals may form and texture can decline, but it will still taste fine.
Q4: Can I make Swirled Strawberry Ice Cream Without an Ice Cream Maker dairy-free?
A4: You can try coconut cream (the thick canned variety) whipped in place of dairy cream and use sweetened condensed coconut milk instead of regular sweetened condensed milk. Results will be slightly different in flavor and texture but still delicious.
Q5: Is Swirled Strawberry Ice Cream Without an Ice Cream Maker kid-friendly to make with help?
A5: Definitely. Kids can help dice strawberries, stir the sauce (under supervision), and do the fun swirling step. It’s a wonderful, safe project to teach simple cooking techniques and enjoy a homemade treat together.
If you try this recipe, tell me how you swirled it — delicate ribbons or dramatic marble? I love swapping ideas and little tweaks that make the recipe your own.
Print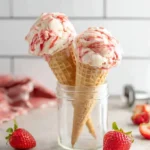
Swirled Strawberry Ice Cream Without an Ice Cream Maker
- Total Time: 360 minutes
- Yield: 4 servings 1x
- Diet: Vegetarian
Description
A creamy and easy strawberry ice cream recipe that requires no machine — perfect for home cooks and beginners.
Ingredients
- 500 ml thick whipping cream, well chilled
- 397 g sweetened condensed milk
- 1 teaspoon pure vanilla extract
- 375 ml fresh strawberries, diced
- 80 ml granulated sugar
- 1 teaspoon lemon juice (optional)
- A pinch of sea salt (optional)
- Toasted almond slices or crushed graham crackers (optional)
- Fresh mint leaves for serving (optional)
Instructions
- Wash and dry the strawberries, then cut them into small dice. Reserve half for later.
- Cook the remaining diced strawberries with sugar over low heat for 8-10 minutes until soft and syrupy. Let cool.
- In a bowl, mix sweetened condensed milk and vanilla extract until combined.
- Puree the cooled strawberry sauce until smooth, then transfer to a bowl to cool completely.
- Chill a mixing bowl and beaters, then pour in the whipping cream and whip until stiff peaks form.
- Fold in the sweetened condensed milk mixture into the whipped cream until just combined.
- Gently fold in the reserved diced strawberries.
- Layer two-thirds of the mixture in a loaf pan, top with strawberry puree, then add the remaining cream mixture.
- Swirl the mixture with a knife for a pretty pattern.
- Cover and freeze for at least 6 hours or overnight.
- Let sit at room temperature for 5 minutes to soften before scooping and serving.
Notes
For best texture, chill the mixing equipment and ensure the strawberry sauce is cool before combining.
- Prep Time: 15 minutes
- Cook Time: 10 minutes
- Category: Dessert
- Method: No-Churn
- Cuisine: American
Nutrition
- Serving Size: 1 serving
- Calories: 300
- Sugar: 26g
- Sodium: 40mg
- Fat: 20g
- Saturated Fat: 12g
- Unsaturated Fat: 8g
- Trans Fat: 0g
- Carbohydrates: 36g
- Fiber: 1g
- Protein: 4g
- Cholesterol: 70mg
Keywords: strawberry ice cream, no churn ice cream, easy dessert, homemade ice cream