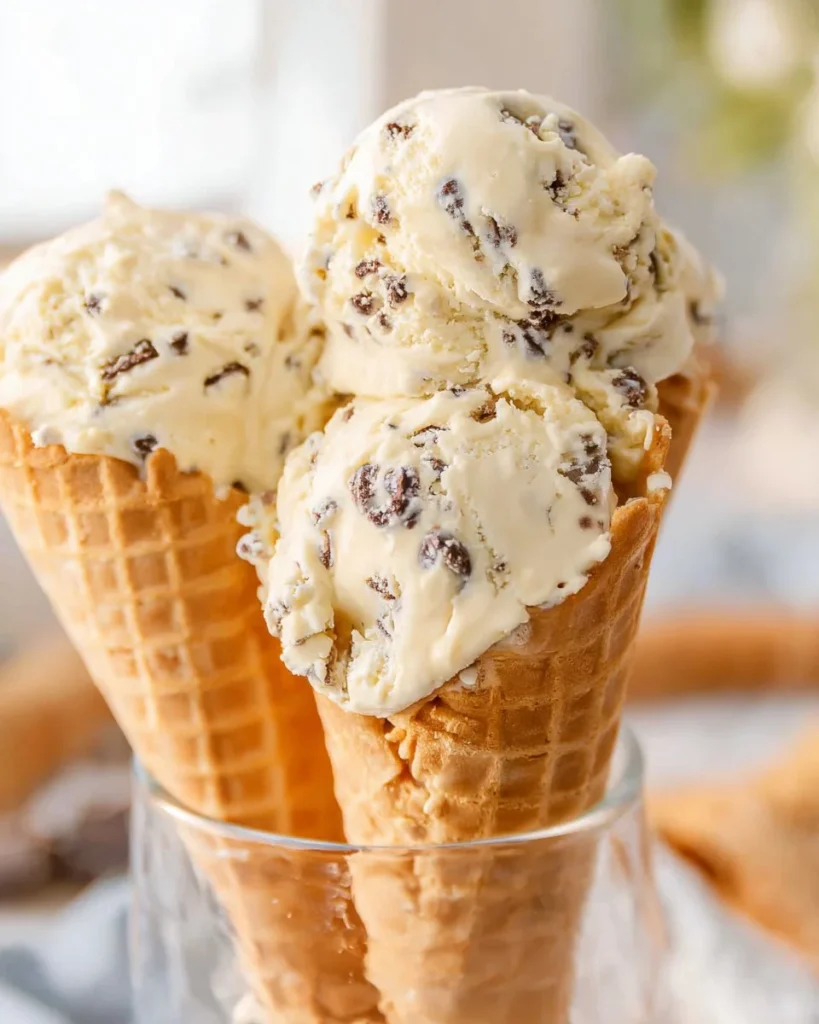
I still remember the late summer night when a sudden chocolate-chip–ice-cream craving sent me hunting through the freezer and pantry at midnight — not a soul awake but somehow the kitchen felt alive. Have you ever wanted homemade ice cream but felt daunted by fancy machines or long churn times? If you’re a beginner, the toughest part might be believing such a silky, scoopable dessert can come from just a few pantry staples and a freezer. I promise this Vanilla Ice Cream with Chocolate Chips Without an Ice Cream Maker is easy, forgiving, and delivers that cozy, nostalgic comfort without any complicated equipment. If you like playful combos, I sometimes serve a scoop alongside my Ninja chocolate milkshake for an extra indulgent treat.
A Quick Look at This Vanilla Ice Cream with Chocolate Chips Without an Ice Cream Maker Recipe
This recipe relies on two star ingredients: cold heavy whipping cream and sweetened condensed milk — they combine to make a luxuriously creamy base without cooking or churning. A splash of vanilla gives warmth, and mini semi-sweet chocolate chips add that classic crunch and chocolatey pop. The big benefit? No ice cream maker, no fuss, and the texture is surprisingly scoopable straight from the freezer after resting. It’s perfect for home cooks and beginners because the technique is mostly folding and freezing, so mistakes are easy to fix. Keep reading — I’ll walk you through every step, troubleshooting tips, and serving ideas so your dessert turns out just like you hoped.
Ingredients You’ll Need for Vanilla Ice Cream with Chocolate Chips Without an Ice Cream Maker
Essentials
- 2 cups (about 480 ml) cold heavy whipping cream — well chilled in the fridge
- 400 grams (about 1 3/4 cups) sweetened condensed milk — full-fat for best texture
- 1 teaspoon pure vanilla extract
- 1/2 cup mini semi-sweet chocolate chips, plus a few extra tablespoons for sprinkling on top
Optional add-ons
- 1–2 tablespoons cocoa nibs or chopped dark chocolate for a more intense chocolate bite
- A pinch of flaky sea salt to enhance the vanilla and chocolate flavors
- 1 teaspoon vanilla bean paste instead of extract for a speckled, richer vanilla
- A swirl of caramel or chocolate sauce folded in for a ripple effect
Substitutions and shortcuts
- Dairy-free version: Use chilled full-fat coconut cream in place of heavy cream and a dairy-free sweetened condensed milk alternative (commercially available or homemade). Note: texture will be slightly different but still delicious.
- Lower-sugar option: Reduce chips or use dark chocolate with higher cocoa content; the sweetened condensed milk cannot be omitted without affecting texture.
- If you don’t have mini chips, coarsely chop regular chips or a chocolate bar; tossing them in a tablespoon of flour or cocoa powder first helps prevent sinking.
- In a pinch, you can whip the cream by hand with a whisk, but expect more arm work and slightly longer time to reach stiff peaks.
- Want a faster set? Use a shallow metal pan (instead of a loaf pan) to reduce freezing time, but still allow at least 4–6 hours for proper firmness.
How to Make Vanilla Ice Cream with Chocolate Chips Without an Ice Cream Maker Step-by-Step
I’ll walk you through this the same way I make it at home: slow, careful, and with little shortcuts that help everything turn out well.
Chill your tools and ingredients
- Place a large mixing bowl and the beaters (or whisk attachment) in the refrigerator for at least 15–20 minutes before starting. Cold equipment helps the cream whip up faster and hold its structure.
- Keep the heavy whipping cream in the coldest part of the fridge until you’re ready to whip.
Whip the cream
- Pour the cold heavy whipping cream into the chilled bowl.
- Using an electric mixer on medium-high speed, whip the cream until it forms stiff peaks. You’ll know you’re there when the cream holds its shape firmly and the peaks stand straight when you lift the beaters. This takes about 3–5 minutes depending on your mixer.
- Tip: Stop intermittently to check; overwhipping can turn cream grainy and lead to a texture closer to butter.
Mix the sweetened condensed milk and vanilla
- In a separate smaller bowl, pour the sweetened condensed milk and stir in the vanilla extract until combined and smooth.
- Taste lightly — it should be very sweet and have a pronounced vanilla note. If you like a stronger vanilla flavor, this is where you can add a touch more.
Combine the two mixtures
- Using a large spatula, add about one-third of the whipped cream to the condensed milk mixture and fold gently. This lightens the dense condensed milk and makes it easier to incorporate.
- Now carefully fold the combined mixture back into the remaining whipped cream. Use gentle, sweeping strokes from the bottom of the bowl to the top, rotating the bowl as you go. The goal is to preserve as much air as possible — that air is what keeps the ice cream light and scoopable.
Add the chocolate chips
- Once the base is fully combined and smooth, sprinkle in the mini semi-sweet chocolate chips and fold them in gently to distribute evenly.
- If you’re using any optional mix-ins (sea salt, chopped chocolate, swirls), add them now, folding just enough to incorporate.
Transfer and finish
- Spoon the mixture into a loaf pan or an airtight container. Smooth the top with a spatula.
- Sprinkle a few extra mini chocolate chips over the surface for a pretty finish and a hint of crunch on the first scoop.
Freeze
- Cover the pan tightly with plastic wrap or a lid. Freeze for at least 6 hours, preferably overnight. The mixture should set to a scoopable consistency.
- Tip: For the smoothest texture, stir gently once after 2–3 hours to break up any large ice crystals (optional). If you do this, use a fork or spatula and work quickly to avoid warming the mixture too much.
Serve
- When ready to serve, let the ice cream sit at room temperature for 3–5 minutes to soften slightly for perfect scoops.
- Use a warmed ice cream scoop or dip your scoop in hot water and wipe dry between scoops.
- Garnish with extra chocolate chips or a sprinkle of flaky sea salt if desired.
Common Mistakes to Avoid
Even a simple recipe can go sideways; here are the mistakes I’ve learned to watch for over the years and how to avoid them.
Mistake 1: Overwhipping the cream
It’s tempting to whip the cream until it’s super stiff, but pushing it too far will start to make it grainy and eventually turn it buttery. Stop whipping as soon as the cream forms firm peaks that hold their shape, and check frequently toward the end.
Mistake 2: Folding too aggressively
Folding is an art. If you mix too vigorously, you’ll knock out the air you just whipped in, and your ice cream will be dense and icy rather than light and creamy. Use wide, gentle strokes and incorporate in stages for the best texture.
Mistake 3: Freezing too quickly or too shallow
Using a very small, deep container can make the freezing uneven and promote large ice crystals. A shallow, wide pan helps the ice freeze more evenly. Also, don’t be tempted to crank the freezer colder than usual to speed things up — a slower, steady freeze makes a smoother result.
Serving Suggestions for Vanilla Ice Cream with Chocolate Chips Without an Ice Cream Maker
This ice cream is versatile and homestyle — it’s just as happy in a bowl as it is atop a warm dessert.
I like to think of this ice cream as a cozy base that gets better with little finishing touches. Below are simple, home-friendly ways to serve it.
Sundae-style with warm sauce
Place two scoops in a bowl and drizzle warm chocolate or caramel sauce over the top. Add chopped nuts, a sprinkle of sea salt, or a maraschino cherry for a classic treat.
Between cookies or waffle cones
Make ice cream sandwiches with soft cookies or a warm waffle cone. I love a scoop tucked between two chewy chocolate chip cookies — easy to hold and fun for kids.
Paired with fruit or coffee
For a lighter contrast, serve a scoop alongside baked fruit (like warm berries or peaches) or as a cooling counterpoint to a cup of strong coffee. It’s also a lovely complement to fizzy summer drinks if you want to create a float.

Conclusion
I hope you can see how straightforward and satisfying this Vanilla Ice Cream with Chocolate Chips Without an Ice Cream Maker is — it’s easier than it looks, and a great introduction to homemade frozen desserts. I love that it’s customizable: swap the chips for chopped candy, add a ripple of jam, or stir in toasted nuts for a textural lift. If you try it, let me know what combination you created and how it turned out — I always learn new tweaks from readers. For a bit of inspiration on the classic chocolate-and-vanilla pairing, I often look to traditional variations like the Italian stracciatella; you can read about that technique at Stracciatella – Glace vanille et chocolat – Recette italienne.
FAQs About Vanilla Ice Cream with Chocolate Chips Without an Ice Cream Maker
Q1: How long does Vanilla Ice Cream with Chocolate Chips Without an Ice Cream Maker keep in the freezer?
A1: Stored in an airtight container, this Vanilla Ice Cream with Chocolate Chips Without an Ice Cream Maker will keep well for about 2 weeks at peak flavor and texture. After that, it can still be eaten but may develop more ice crystals and a slightly firmer texture. Press a piece of plastic wrap directly onto the surface before sealing to reduce freezer burn.
Q2: Can I make Vanilla Ice Cream with Chocolate Chips Without an Ice Cream Maker ahead of time for a party?
A2: Yes — this Vanilla Ice Cream with Chocolate Chips Without an Ice Cream Maker is ideal for making a day or two ahead. Freeze overnight to ensure it’s fully set, and take it out 5–10 minutes before serving to soften slightly for easier scooping.
Q3: Can I add mix-ins to Vanilla Ice Cream with Chocolate Chips Without an Ice Cream Maker without ruining the texture?
A3: Absolutely. Small, dry mix-ins like chocolate chips, nuts, or cookie crumbs work best in Vanilla Ice Cream with Chocolate Chips Without an Ice Cream Maker. Avoid adding a lot of liquid mix-ins that could create ice crystals unless they’re swirled in just before freezing.
Q4: Is there a way to make Vanilla Ice Cream with Chocolate Chips Without an Ice Cream Maker less sweet?
A4: Because sweetened condensed milk is a core ingredient that affects both sweetness and texture, reducing it significantly will change the outcome. For a slightly less sweet version of Vanilla Ice Cream with Chocolate Chips Without an Ice Cream Maker, choose semi-sweet or dark chocolate chips and consider adding a small pinch of sea salt to balance the sweetness.
Q5: My Vanilla Ice Cream with Chocolate Chips Without an Ice Cream Maker is icy — what did I do wrong and how can I fix it next time?
A5: Icy texture usually comes from melted cream or an inconsistent freeze. For smoother results, ensure your cream is very cold and your bowl is chilled before whipping; fold gently to keep the air in; and use a shallow, airtight container for freezing. If it’s already icy, let the ice cream sit at room temperature for a few minutes, then stir briskly with a fork to break up ice crystals before serving.

Vanilla Ice Cream with Chocolate Chips Without an Ice Cream Maker
- Total Time: 375 minutes
- Yield: 4 servings 1x
- Diet: Vegetarian
Description
A simple, no-churn vanilla ice cream recipe with chocolate chips, perfect for beginners and made with basic pantry ingredients.
Ingredients
- 2 cups (about 480 ml) cold heavy whipping cream
- 400 grams (about 1 3/4 cups) sweetened condensed milk
- 1 teaspoon pure vanilla extract
- 1/2 cup mini semi-sweet chocolate chips, plus extra for topping
Instructions
- Chill your tools and ingredients by placing a large mixing bowl and beaters in the refrigerator for at least 15-20 minutes.
- Pour the cold heavy whipping cream into the chilled bowl and whip on medium-high speed until stiff peaks form (about 3-5 minutes).
- In a separate bowl, mix the sweetened condensed milk and vanilla extract until smooth.
- Fold one-third of the whipped cream into the condensed milk mixture to lighten it, then gently fold the lightened mixture back into the remaining whipped cream.
- Sprinkle in the mini chocolate chips and any optional mix-ins, folding gently.
- Transfer the mixture to a loaf pan or airtight container and smooth the top. Sprinkle extra chocolate chips on top.
- Cover and freeze for at least 6 hours or overnight until firm.
- Serve by letting the ice cream sit at room temperature for 3-5 minutes, then scoop and enjoy.
Notes
For a dairy-free version, substitute coconut cream and a dairy-free sweetened condensed milk. Avoid overwhipping the cream to prevent a grainy texture.
- Prep Time: 15 minutes
- Cook Time: 360 minutes
- Category: Dessert
- Method: No Churn
- Cuisine: American
Nutrition
- Serving Size: 1 serving
- Calories: 350
- Sugar: 28g
- Sodium: 100mg
- Fat: 22g
- Saturated Fat: 14g
- Unsaturated Fat: 8g
- Trans Fat: 0g
- Carbohydrates: 38g
- Fiber: 1g
- Protein: 4g
- Cholesterol: 70mg
Keywords: ice cream, vanilla ice cream, no churn ice cream, chocolate chip ice cream