Weeknight lifesaver for busy families
After a long day of after-school chaos, sports practice, or a late workday, I know the last thing you want is a fussy dessert to make or a huge cleanup to handle. That’s why I love this Blizzard Ninja Slushi — it’s fast, forgiving, and kid-approved, so you can turn a simple pantry moment into a smooth, creamy treat that feels special without the stress. If you like quick frozen treats, you might enjoy my take on a chocolate milkshake too: my Ninja Slushi chocolate milkshake adventure.
A Quick Look at This Blizzard Ninja Slushi Recipe
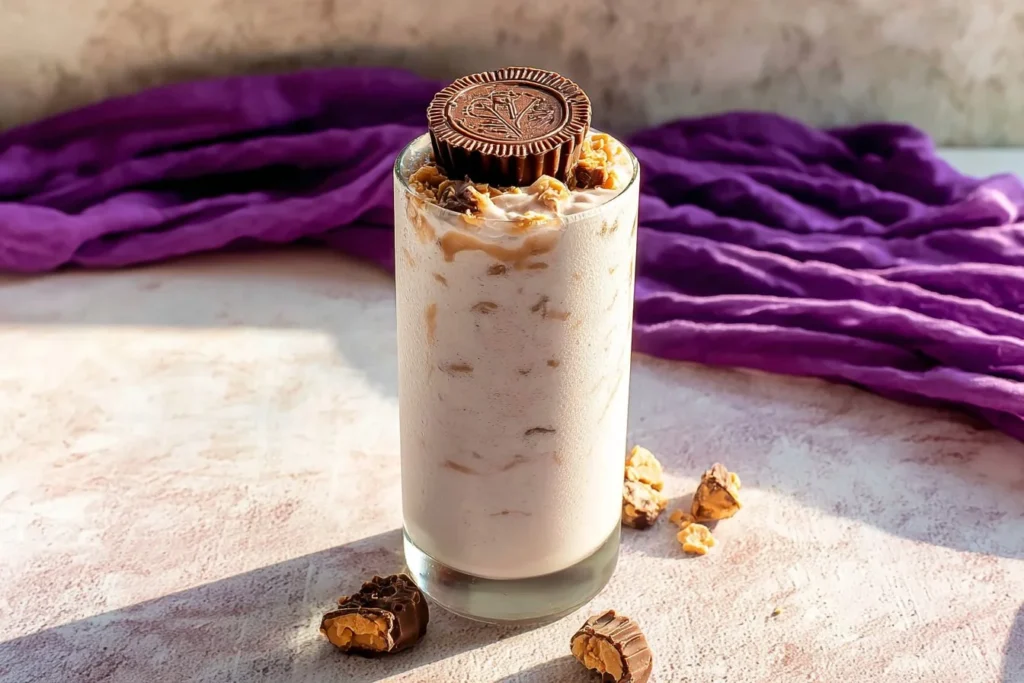
This Blizzard Ninja Slushi blends two family favorites — milk and vanilla — into a thick, spoonable slush that both kids and adults love. It uses just a few pantry staples and your Ninja Slushi machine, so prep is under five minutes and cleanup is minimal. The crushed candy or Reese’s Peanut Butter Cups folded in at the end add texture and a fun surprise in every scoop. It’s perfect for weeknights, after-school rewards, or a simple weekend pick-me-up — and I promise it’s easier than it looks.
If you like fruity slushes, this same method works great for bright flavors like blue raspberry — check out an easy version here: Ninja Slushi blue raspberry slush.
Ingredients You’ll Need for Blizzard Ninja Slushi
Here’s everything to keep on hand so you can make a Blizzard Ninja Slushi any night of the week. I break this into everyday essentials, optional extras for a flavor boost, and substitutions or shortcuts for busy nights.
Essentials
- 4 cups milk (whole milk recommended for creaminess; any milk will work — dairy or plant-based)
- 1 teaspoon vanilla extract
- 3/4 to 1 cup granulated sugar or your preferred sweetener (adjust to taste)
- Crushed candies or Reese’s Peanut Butter Cups — as much as your family likes (I list a suggested amount below)
These basics are all common items I keep stocked. Whole milk gives you that classic Blizzard texture, but if you’re watching calories or dairy, lighter milks or oat milk are fine and still tasty.
Optional Add-ons
- A pinch of salt to boost flavor
- 2 tablespoons of cocoa powder for a chocolate twist
- A few tablespoons of peanut butter for extra richness
- Mini chocolate chips or chopped chocolate for texture
- A tablespoon of instant espresso powder if adults want a mocha vibe
- Whipped cream and a drizzle of chocolate or caramel for topping
A little add-on goes a long way. I usually keep mini chocolate chips on hand for a quick sprinkle.
Substitutions and Shortcuts
- Swap sugar for a granulated non-nutritive sweetener one-for-one (adjust to taste).
- Use flavored milk (chocolate or strawberry) to cut back on added ingredients and speed things up.
- Buy pre-crushed candy or pulse candy wrappers and candy in a bag in short bursts in the food processor — saves time and keeps kids happy.
- Use store-bought ice cream instead of milk for a faster, thicker result — mix 1–2 cups softened ice cream with 2–3 cups milk to reach desired texture.
- Plant-based milks: almond, oat, or soy work — oat milk gives a creamy mouthfeel closest to whole milk.
- If you’re in a rush, use pre-made milkshake mixes to cut down whisking time; just thin them slightly with milk.
I often use flavored milk when I’m short on time — it skips the vanilla and some of the sugar and still tastes indulgent.
How to Make Blizzard Ninja Slushi Step-by-Step
I keep these steps short and practical so you can get the job done fast. The method is forgiving — you don’t need exact timing, and little swaps won’t ruin the result.
- Measure milk into a large pitcher or mixing bowl. Use 4 cups for a thicker yield.
- Add vanilla and the 3/4 to 1 cup sweetener. A quick tip: start on the lower side and taste after the slushi churns; you can always add more sweetness later.
- Whisk briefly to dissolve most of the sugar and break up lumps. I usually whisk 20–30 seconds — fast and effective.
- Pour the mixture into your Ninja Slushi container. Wipe the pitcher to avoid drips and extra dishes.
- Place the container in the Ninja Slushi and select the Milkshake program. Press start.
- Let the machine run. Timing varies from 15 to 45 minutes based on sugar content and initial temperature — colder and sweeter liquids freeze faster.
- Once it reaches a thick, spoonable consistency, place a large glass or bowl under the dispenser — the Blizzard will be creamy and thick.
- Dispense about half into the cup or bowl. Sprinkle in half of the crushed candies or chopped Reese’s and stir gently to fold them in.
- Finish filling the cup with the remaining Blizzard and gently fold in the rest of the candies so they’re evenly distributed.
- Serve immediately with a long spoon or wide straw. If you need to hold it briefly, place the cup in the freezer for 5–10 minutes to firm it up.
Time-saving notes: whisk straight in the pitcher you’ll use to pour to avoid extra bowls. You don’t need perfect measurements — this recipe tolerates variation well. For bigger families, double the recipe but churn in separate batches to avoid overfilling the machine.
If you want a deeper guide to machine tips and a related slushie experience, I detailed my process here: my Ninja Slushie Maker experience.
Common Mistakes to Avoid
I want you to feel calm and efficient in the kitchen. Avoid these common slip-ups to save time, minimize cleanup, and keep everyone at the table happy.
Mistake 1: Skipping the whisk
Not dissolving the sugar first can lead to grainy texture and longer churn times. A quick whisk for 20–30 seconds makes the Blender finish faster and gives a smoother result.
Mistake 2: Overfilling the machine
Trying to churn too large a batch at once slows the process and can be messy. Make smaller, manageable batches so the Ninja Slushi does the heavy lifting without spills.
Mistake 3: Adding all mix-ins too early
Stirring candies or mix-ins into the milk before freezing can gunk up the machine and slow freezing. Wait until after the cycle to add crunchy bits so they stay fresh and the machine stays clean.
Serving Suggestions for Blizzard Ninja Slushi
This treat is best fresh and simple. A few quick sides or toppings turn it into a mini dessert party without adding prep stress.
I like pairing the Blizzard with easy, kid-friendly options that require minimal prep and no cooking.
Kid-friendly sides
- Fruit slices (banana, apple, or strawberries) — quick and healthy
- Graham crackers or animal crackers for dipping
- A small cookie on the side for a scoop-and-cookie combo
These sides are quick to plate and usually in the pantry or fridge already.
Easy add-ons
- A small bowl of extra crushed candy or chopped peanuts so kids can sprinkle their own
- Mini chocolate chips or rainbow sprinkles for a festive touch
- A drizzle of chocolate or caramel sauce for older kids and adults
Put add-ons in small bowls so the family can customize — no extra dishes beyond the bowls.
Minimal prep combos
- Serve with store-bought soft pretzels for a salty-sweet pairing
- Pair with pre-cut fruit and a yogurt dip for a balanced plate
- Offer a mini scoop of vanilla ice cream on the side for an ultra-indulgent option
If you love fruit-forward slushes, this recipe style also pairs well with a simple cherry-limeade twist; I recommend trying a refreshing version here: Ninja Slushi cherry limeade slush.
##FAQs About Blizzard Ninja Slushi
Q1: How long does a Blizzard Ninja Slushi take to make from start to finish?
A1: The active prep time is about 5 minutes — whisking and pouring. The Ninja Slushi cycle can run 15–45 minutes depending on how cold or sweet the mix is. Plan for 20–30 minutes on average. I often start the machine right after dinner so it’s ready for an after-school or after-practice treat.
Q2: Can I store leftovers of Blizzard Ninja Slushi, and how long will they keep?
A2: You can store leftovers in an airtight container in the freezer for up to 3 days. The texture may firm up, so let it sit at room temperature for 5–10 minutes and give it a quick stir before serving. For best texture, I recommend enjoying it fresh.
Q3: Is the Blizzard Ninja Slushi recipe kid-friendly for picky eaters?
A3: Yes — it’s very adaptable. Keep the base plain with just milk and vanilla, and offer candies or mix-ins on the side so picky eaters can control what goes in. I’ve found letting kids customize keeps complaints to a minimum.
Q4: Can I make a dairy-free Blizzard Ninja Slushi for lactose-sensitive kids?
A4: Absolutely. Swap the milk for oat, almond, or soy milk. Oat milk usually gives the creamiest result closest to whole milk. You may need to adjust sweetness slightly because some plant milks are already sweetened.
Q5: Will using different candies change the freezing time of a Blizzard Ninja Slushi?
A5: Mix-ins added after churning won’t change freezing time. If you mix in sugary syrups or pre-sweetened milk before starting, the added sugar can speed up freezing slightly. For crunchy candy pieces, add them after the cycle so the machine runs normally and you keep the candy texture.

Conclusion
I keep this Blizzard Ninja Slushi recipe in my weeknight rotation because it’s quick, adaptable, and reliably pleasing to kids and adults alike — perfect for busy families when time and energy are low. If you want a ready reference for flavors and machine tips, I often look to resources that compare recipes and give practical ideas like the overview at Ninja Slushi Blizzard – Stay Snatched. For product details, compatible accessories, and official guidance on Ninja frozen-treat machines, the manufacturer’s page is helpful: Ninja® Ice Cream Makers – SharkNinja.
Give this easy Blizzard Ninja Slushi a try on a busy night — I’m confident it’ll become one of those simple family favorites you reach for again and again.
Print
Blizzard Ninja Slushi
- Total Time: 35 minutes
- Yield: 4 servings 1x
- Diet: Vegetarian
Description
A quick and creamy treat made with milk and vanilla, perfect for busy families and kids alike.
Ingredients
- 4 cups milk (whole recommended)
- 1 teaspoon vanilla extract
- 3/4 to 1 cup granulated sugar or preferred sweetener
- Crushed candies or Reese’s Peanut Butter Cups (to taste)
- A pinch of salt (optional)
- 2 tablespoons cocoa powder (optional)
- A few tablespoons of peanut butter (optional)
- Mini chocolate chips or chopped chocolate (optional)
- A tablespoon of instant espresso powder (optional)
- Whipped cream (for topping)
- Chocolate or caramel sauce (for drizzling)
Instructions
- Measure milk into a large pitcher or mixing bowl.
- Add vanilla and 3/4 to 1 cup sweetener.
- Whisk briefly to dissolve most of the sugar.
- Pour the mixture into your Ninja Slushi container.
- Place the container in the Ninja Slushi and select the Milkshake program.
- Let the machine run until it reaches a thick, spoonable consistency (15-45 minutes).
- Dispense half into a cup and fold in half of the crushed candies.
- Finish filling the cup with the remaining slush and fold in the rest of the candies.
- Serve immediately with a long spoon or wide straw.
Notes
This recipe is forgiving—variance in measurements won’t ruin the result. For larger families, double the recipe but churn in separate batches.
- Prep Time: 5 minutes
- Cook Time: 30 minutes
- Category: Dessert
- Method: Blending
- Cuisine: American
Nutrition
- Serving Size: 1 serving
- Calories: 250
- Sugar: 30g
- Sodium: 100mg
- Fat: 5g
- Saturated Fat: 2g
- Unsaturated Fat: 3g
- Trans Fat: 0g
- Carbohydrates: 40g
- Fiber: 0g
- Protein: 8g
- Cholesterol: 20mg
Keywords: slushi, dessert, quick treat, kids, family-friendly, frozen treat


1 thought on “Blizzard Ninja Slushi”