Have you ever encountered an ice cream so delightful, it instantly catapults you back to childhood birthday parties filled with laughter and joy? It was at my own birthday parties, surrounded by friends, balloons, and, of course, a stunning cake, that I realized just how magical birthdays could be. The cakes were always beautifully frosted, and the ice cream—oh, the ice cream! It was the cherry on top of those unforgettable moments.
Today, I’m excited to share with you my equally delightful Ninja Creami Birthday Cake Ice Cream Recipe. Don’t worry if you’ve never made ice cream before; this recipe will guide you every step of the way, making it simple, stress-free, and totally doable—yes, even for beginners!
So, if you’re ready to create a slice of nostalgia right in your kitchen, grab your apron, and let’s dive into making this creamy, dreamy birthday cake ice cream!
SKIP TO
Why I Love This Recipe of Ninja Creami Birthday Cake Ice Cream Recipe
This recipe holds a special place in my heart for a few reasons. First and foremost, it perfectly captures the essence of a birthday cake, transformed into a delightful frozen treat. The combination of rich flavors from the heavy cream and half-and-half, paired with the creaminess of cottage cheese and the sweetness of condensed milk, makes this ice cream irresistible. The sprinkles? They’re the confetti on this delicious celebration, reminding us that every day can be a little festive.
You’ll appreciate this recipe not only for its delightful taste but also for its simplicity. Even if you’re new to cooking, making ice cream at home becomes a cozy and fun activity with this recipe. It’s an opportunity to bond with family, create sweet memories, and indulge in something extra special.
Print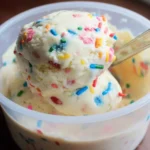
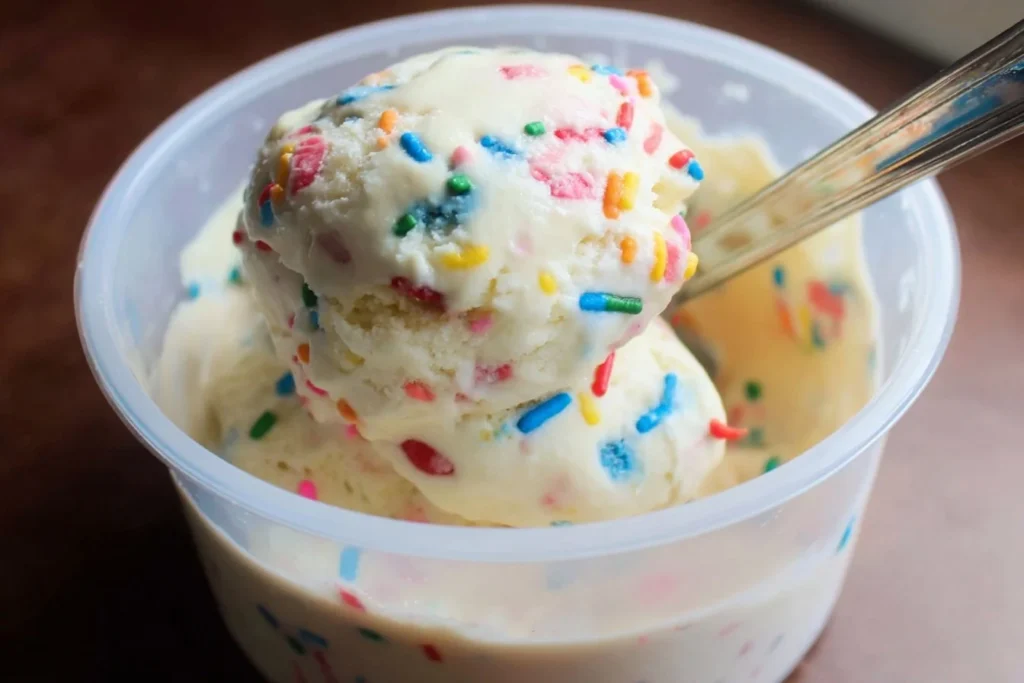
Ninja Creami Birthday Cake Ice Cream
- Total Time: 24 hours 15 minutes
- Yield: 4 servings 1x
- Diet: Vegetarian
Description
A delightful ice cream recipe that captures the essence of birthday cake, complete with rich flavors and colorful sprinkles.
Ingredients
- 1 cup Heavy Cream
- 1 cup Half and Half
- ½ cup Cottage Cheese
- ½ cup Condensed Milk
- 2 teaspoons Vanilla Extract (or Vanilla Bean Paste)
- ¼ cup Sprinkles
Instructions
- Prepare your blender.
- Blend the ingredients until smooth: heavy cream, half-and-half, cottage cheese, condensed milk, and vanilla.
- Pour the mixture into the Ninja Creami pint container.
- Freeze overnight (18-24 hours).
- Process in the Ninja Creami using the “Lite Ice Cream” setting.
- Stir in the sprinkles by hand.
- Serve in bowls and enjoy!
Notes
Ensure all ingredients are blended thoroughly and freeze long enough for optimal results. Customize with mix-ins like fruit or cookies as desired.
- Prep Time: 15 minutes
- Cook Time: 0 minutes
- Category: Dessert
- Method: Freezing
- Cuisine: American
Nutrition
- Serving Size: 1 serving
- Calories: 350
- Sugar: 30g
- Sodium: 100mg
- Fat: 25g
- Saturated Fat: 15g
- Unsaturated Fat: 8g
- Trans Fat: 0g
- Carbohydrates: 30g
- Fiber: 0g
- Protein: 6g
- Cholesterol: 70mg
Keywords: ice cream, birthday cake, dessert, Ninja Creami, homemade ice cream
Ingredients You’ll Need for Ninja Creami Birthday Cake Ice Cream Recipe
Here’s what you will need to create your very own batch of Ninja Creami Birthday Cake Ice Cream. Everything is simple and straightforward—no fancy ingredients here!
Essentials
1 cup Heavy Cream
This is what gives the ice cream that luscious, rich texture. Heavy cream has a high fat content, which results in creaminess that will make you want to return for seconds (and thirds).1 cup Half and Half
A lovely balance between cream and milk, half-and-half contributes to a velvety consistency without overpowering the richness of the heavy cream.½ cup Cottage Cheese
Believe it or not, this might be the secret ingredient! Cottage cheese adds creaminess and a bit of protein, making this treat feel a little less indulgent without sacrificing flavor or texture.½ cup Condensed Milk
This sweet addition brings a smooth, caramelized sweetness that ties all the flavors together. It’s like the icing on the cake, just without the calories!2 teaspoons Vanilla Extract (or Vanilla Bean Paste)
Rich vanilla flavor is a key player in this recipe. Either option works wonderfully, but vanilla bean paste can give a lovely speckled effect that looks and tastes fabulous.¼ cup Sprinkles
How could we make birthday cake ice cream without sprinkles? They add a fun burst of color and a little crunch that truly makes it feel like a celebration.
Optional Add-Ons & Substitutions
Flavor Variations: Feeling adventurous? You can add in some crushed cookies or fruit to create different flavor combinations. A handful of crushed Oreos or a swirl of strawberry puree could add exciting twists to your ice cream.
Dairy-Free Alternative: If you’re looking for a dairy-free option, consider using coconut cream instead of heavy cream and half-and-half, and a dairy-free condensed milk substitute. The flavor will be uniquely delightful!
Sweetness Level: If you prefer a less sweet ice cream, feel free to cut back on the condensed milk a bit. It’ll still taste fantastic, and you can always add more sprinkles for a bit of added sweetness.
How to Make Ninja Creami Birthday Cake Ice Cream Recipe Step-by-Step
Making ice cream may seem daunting, but trust me, it’s a whole lot easier than you might think! Here’s your detailed step-by-step guide to whipping up this delicious birthday cake ice cream.
Step 1: Prepare Your Blender
Start with a clean blender, as you’ll be combining all your delicious ingredients in one go.
Step 2: Blend the Ingredients
Toss in the following into your blender:
- 1 cup heavy cream
- 1 cup half-and-half
- ½ cup cottage cheese
- ½ cup condensed milk
- 2 teaspoons vanilla extract or vanilla bean paste
Blend on medium high speed for about 30 seconds, or until the mixture is smooth and well combined. Be sure to scrape down the sides of the blender to ensure everything gets blended thoroughly.
Step 3: Pour into Pint Container
Carefully pour the blended mixture into your Ninja Creami pint container, taking care not to exceed the “max fill” line. This step is crucial; overfilling will create a mess in your Ninja Creami machine!
Step 4: Freeze Overnight
Place the pint container in the freezer and let it freeze for at least 18-24 hours. It’s essential to allow enough time for the mixture to become solid, so be patient; great things take time!
Step 5: Process with Ninja Creami
Once your ice cream has frozen, remove the pint container from the freezer. Attach the pint holder lid and secure it in place. Now, it’s time to let the Ninja Creami do its magic! Select the “Lite Ice Cream” setting, and watch as your mixture transforms into a creamy, dreamy ice cream.
Step 6: Stir in Sprinkles
After your ice cream has been processed, remove it from the machine and stir the sprinkles in by hand. This will ensure they’re evenly distributed, adding that lovely birthday cake touch throughout.
Step 7: Serve
Scoop the delicious birthday cake ice cream into bowls, and if you’re feeling extra festive, top with more sprinkles. Now it’s ready to be enjoyed!
Would you be interested in more ice creams? I invite you check the list of 16 Best Iced Coffee Recipes, or the Ninja Creami recipes.
Common Mistakes to Avoid Ninja Creami Birthday Cake Ice Cream Recipe
Not Blending Ingredients Thoroughly
Make sure that all your ingredients are blended well for a smooth, creamy texture. If your cottage cheese isn’t fully blended, it can produce an undesirable texture in the final ice cream.
Overfilling the Pint Container
Always pay close attention to that max fill line! If you overfill it, not only do you risk a mess, but it also can affect the freezing and processing performance of the Ninja Creami.
Not Freezing Long Enough
Patience is key! If you pull your pint out of the freezer too soon, the mixture won’t be solid enough to process into ice cream. Aim for that sweet spot of 18-24 hours for optimal results.
Ignoring the Mix-Ins
Don’t skip out on the sprinkles! They are essential for achieving that classic birthday cake flavor and visual appeal. Stir them in after processing for the best results.
Serving Suggestions for Ninja Creami Birthday Cake Ice Cream
Joyful Sundaes
Create delightful ice cream sundaes using your birthday cake ice cream as a base, and top them with whipped cream, chocolate syrup, and even more sprinkles for over-the-top enjoyment!
Party Treats
This ice cream is perfect for parties or family gatherings. Serve it in a fun ice cream bar style, allowing guests to choose their toppings, like crushed cookies, fresh fruit, or flavored syrups.
Ice Cream Sandwiches
Grab some cookies and sandwich a scoop of your birthday cake ice cream between two! Chocolate chip or sugar cookies are fantastic options that complement the creamy ice cream beautifully.
Shakes and Smoothies
For a quick treat, blend a scoop of your birthday cake ice cream with some milk for a dreamy shake. It’s a delicious and decadent way to enjoy this flavor when you’re craving something extra special.
Pro-Level Tips for When You’re Ready
Experiment with Flavor Profiles
Once you’ve mastered the basic birthday cake flavor, don’t be afraid to experiment! Try adding different extracts, such as almond or coconut, or even a splash of fresh fruit puree to take your ice cream to the next level.
Utilize Seasonal Ingredients
During summer, you can incorporate seasonal berries or ripe peaches into your ice cream. Simply blend them in with the base or add them as a mix-in for a fresh twist.
Perfect Your Texture
If you prefer a softer or creamier texture, you can process the ice cream with the “Lite Ice Cream” setting again for a few seconds. Just keep an eye on it so you don’t overdo it!
Store Properly
If you have leftovers (which can be hard to resist), transfer the ice cream to an airtight container and store it in the freezer. Let it sit at room temperature for a few minutes before scooping to ensure the perfect serving temperature.
Conclusion
Congratulations! You’ve mastered the Ninja Creami Birthday Cake Ice Cream Recipe! Who knew something so delicious could be so easy? Now you can recreate that nostalgic experience of childhood birthdays right in your kitchen. What’s even better is that you can customize it to your heart’s desire!
So, gather your loved ones, create some memories, and indulge in this cozy, classic recipe that’s beginner-approved. If you enjoyed this post, consider sharing it with friends, or better yet, invite them over and whip up a batch together!
Looking for more delicious recipes? Follow us on Pinterest and Facebook!
FAQs About Ninja Creami Birthday Cake Ice Cream Recipe
1. What is the Ninja Creami Birthday Cake Ice Cream Recipe?
The Ninja Creami Birthday Cake Ice Cream Recipe combines heavy cream, half-and-half, cottage cheese, condensed milk, vanilla, and sprinkles to create a deliciously creamy ice cream reminiscent of birthday cake.
2. Can I substitute any of the ingredients in the Ninja Creami Birthday Cake Ice Cream Recipe?
Absolutely! You can use coconut cream instead of heavy cream and half-and-half for a dairy-free version, or adjust the sweetness by using less condensed milk.
3. How long do I need to freeze the mixture in the Ninja Creami Birthday Cake Ice Cream Recipe?
Make sure to freeze the mixture for at least 18-24 hours to ensure it solidifies properly before processing in the Ninja Creami.
4. Can I add other ingredients to the Ninja Creami Birthday Cake Ice Cream Recipe?
Definitely! You can add crushed cookies, fruit, or flavored extracts to create your own delicious twist on the classic birthday cake flavor.
5. How do I store leftovers from the Ninja Creami Birthday Cake Ice Cream Recipe?
Transfer any leftover ice cream to an airtight container and store it in the freezer. Allow it to sit at room temperature for a few minutes before scooping for the best texture.
So, what are you waiting for? Get started on your delicious Ninja Creami Birthday Cake Ice Cream today and make every day feel like a celebration!