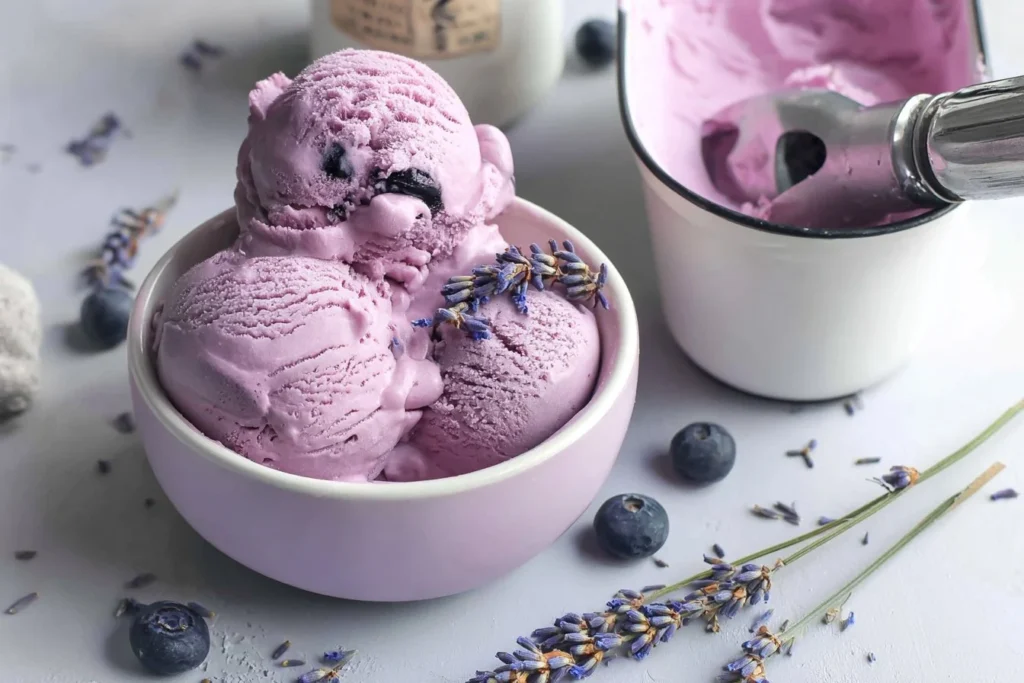
Have you ever sat on a warm summer evening, the sun casting a golden hue over everything around you, and craved a delicious icy treat that doesn’t come with the guilt of sugar overload? It’s those simpler moments that inspired me to whip up a batch of Sugar Free Blueberry Lavender Ice Cream. I fondly remember the first time I attempted this recipe; my house smelled of lavender, and it felt like a cozy tribute to the flavors of summer, even if it turned out a bit grainy on my first try! But I promise, this post will make it simple, stress-free, and utterly doable—even if this is your first try at making homemade ice cream!
Highlights
Why I Love This Sugar Free Blueberry Lavender Ice Cream Recipe
This Sugar Free Blueberry Lavender Ice Cream is special for so many reasons. For starters, it’s vegan and dairy-free, making it an excellent choice for anyone seeking healthier dessert options, whether they follow a specific diet or simply want to treat themselves guilt-free. The delicate balance of sweet blueberries and fragrant lavender works wonderfully together, offering a refreshing taste that transports you straight to a sunny garden.
Beginner cooks will especially appreciate how straightforward this recipe is. With just a handful of ingredients and easy-to-follow steps, you can create a delicious dessert that feels fancy yet remains incredibly practical. Plus, there’s something cozy about making ice cream at home—it has a way of turning an ordinary day into a sweet memory. If you want more flavor ideas later, I’ve bookmarked a bunch of favorites here: Ninja Creami recipes.
Ingredients You’ll Need
When you’re ready to make this delightful recipe, here’s what you’ll need:
Coconut Milk: 2.5 cups of canned coconut milk provides a creamy base that’s naturally lactose-free. Coconut milk is rich and satisfying, making it perfect for ice cream.
Evaporated Coconut Milk: 1/4 cup adds an extra layer of creaminess without the added sugar, perfect for our sugar-free goal.
Vanilla Extract: A teaspoon of vanilla extract enriches the flavor profile, making everything taste a bit more indulgent.
Powdered Sweetener: 1/4 cup of your favorite powdered sugar substitute keeps things sweet without the calories.
Guar Gum: 1/4 teaspoon acts as a thickener and stabilizer, giving your ice cream that smooth, creamy texture.
Dried Lavender: 2 tablespoons of food-grade dried lavender bring a lovely floral note to the dessert. Be sure to use culinary-grade lavender for this.
Fresh Blueberries: 1/4 cup of fresh blueberries not only add flavor but also come packed with antioxidants.
Lemon Zest: A teaspoon of lemon zest brightens everything up, complementing the blueberries and lavender harmoniously.
Salt: A pinch of salt (1/8 teaspoon) enhances the sweetness and balances flavors.

Essentials + Optional Add-Ons
While the above ingredients are essential for this recipe, feel free to play around with optional add-ons like:
- Nut Butters: A tablespoon of almond or cashew butter can add an extra layer of richness.
- Cacao Nibs: For a touch of crunch and chocolate flavor, add some cacao nibs into the mix.
Substitutions and Shortcuts
- If you’re not a fan of lavender, you could replace it with other flavors, such as mint or even a hint of cinnamon for an autumn twist.
- Instead of powdered sweetener, you could use a liquid sweetener like agave syrup, but this may affect the texture, so slightly reduce the coconut milk to compensate.
How to Make Sugar Free Blueberry Lavender Ice Cream Recipe (Vegan, Dairy-Free, Ninja Creami) Step-by-Step
Now, let’s get into the nitty-gritty of making this lovely ice cream. Follow these detailed steps, and you’ll be enjoying a bowl of homemade bliss in no time.
Step 1: Measure Quantities
Before you start, make sure you’ve measured out all your ingredients correctly. If you’re using the Ninja Creami Original 7-in-1, use the standard 1X for quantities. For the Deluxe version, multiply by 1.5.
Step 2: Combine Base Ingredients
In a saucepan, combine 2.5 cups of canned coconut milk, 1/4 cup of evaporated coconut milk, 1 teaspoon of vanilla extract, 1/4 cup of your powdered sweetener, and 1/4 teaspoon of guar gum.
Step 3: Whisk and Heat
Whisk the mixture while it’s still cold, ensuring that all ingredients blend well. Once combined, place the saucepan on medium heat and continue whisking until everything is dissolved. This should take just a few minutes.
Step 4: Infuse with Lavender
After it’s dissolved, stir in 2 tablespoons of dried lavender and let it simmer for about 10 minutes. This process allows the lavender to infuse its aromatic flavor into the mixture.
Step 5: Blend with Blueberries
While the lavender is infusing, take 2 tablespoons of the coconut milk mixture and blend it with 1/4 cup of fresh blueberries until smooth. This is where the magic happens; the blueberries will give your ice cream its distinctive, beautiful color.
Step 6: Strain the Mixture
Once you’ve let the lavender steep, allow the entire mixture to cool. After it cools, strain it to remove the lavender bits. This step ensures that your ice cream has a smooth texture.
Step 7: Combine Everything
In a large bowl, whisk together the strained coconut mixture, the blueberry blend you just made, 1 teaspoon of lemon zest, and 1/8 teaspoon of salt. The salt, while small, is crucial for balancing flavors.
Step 8: Freeze
Pour your ice cream mixture into the Ninja Creami pint and let it freeze for 24 hours. Patience is crucial, but it will be well worth the wait.
Step 9: Turn It into Ice Cream
Once your mixture is frozen solid, it’s time to make ice cream! Place your pint in the Ninja Creami and select the “Smoothie Bowl” or “Lite Ice” function. Watch as it transforms into the creamy, dreamy ice cream you’ve been waiting for!
Step 10: Serve & Enjoy
Scoop out your beautiful, vibrant Sugar Free Blueberry Lavender Ice Cream into bowls, and enjoy the deliciousness of summer in every bite.
Print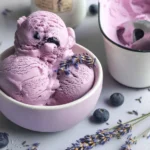
Sugar Free Blueberry Lavender Ice Cream
Description
A refreshing vegan and dairy-free ice cream combining sweet blueberries and floral lavender, perfect for summer indulgence without the guilt.
Ingredients
- 2.5 cups canned coconut milk
- 1/4 cup evaporated coconut milk
- 1 teaspoon vanilla extract
- 1/4 cup powdered sweetener
- 1/4 teaspoon guar gum
- 2 tablespoons dried lavender
- 1/4 cup fresh blueberries
- 1 teaspoon lemon zest
- A pinch of salt (1/8 teaspoon)
Instructions
- Measure all ingredients accurately.
- Combine coconut milk, evaporated coconut milk, vanilla extract, powdered sweetener, and guar gum in a saucepan.
- Whisk the mixture while cold, then heat on medium until dissolved.
- Add dried lavender and simmer for 10 minutes to infuse.
- Blend a couple tablespoons of the mixture with fresh blueberries until smooth.
- Strain the infusing mixture to remove lavender.
- Whisk together strained mixture, blueberry blend, lemon zest, and salt.
- Freeze the mixture in a Ninja Creami pint for 24 hours.
- Process in the Ninja Creami using the
Common Mistakes to Avoid
Even seasoned cooks can make mistakes, so here are a few tips to avoid common pitfalls while making this delightful dessert:
Mistake 1: Not Whisking Well
Ensure you whisk the mixture thoroughly in the first step. If the guar gum or sweetener isn’t fully dissolved, your texture may be gritty.
Mistake 2: Skipping the Straining Step
Straining the lavender out of the mixture is essential. If you skip this, your ice cream will have an unpleasant grainy texture from leftover lavender remnants.
Mistake 3: Incorrect Freezing Time
Be sure to freeze your ice cream mixture for a full 24 hours before processing it in the Ninja Creami; otherwise, it won’t turn out creamy.
Mistake 4: Using Non-Culinary Lavender
Always use food-grade lavender. Regular lavender from the garden might not be safe for consumption and can spoil the flavor of your ice cream.
Serving Suggestions for Sugar Free Blueberry Lavender Ice Cream Recipe
Now that you have this gorgeous ice cream ready to go, here are some delightful ways to serve it!
Pair with Fresh Berries
Serving a scoop alongside fresh blueberries or raspberries adds an aromatic flair while letting the star of the show shine.
Add a Crunch
Top your ice cream with some chopped nuts or granola for added texture and a nutty flavor that complements the sweet and floral notes.
Drizzle with Nut Butter
A little drizzle of almond butter or cashew cream can make each bite more indulgent and add a creamier consistency as you enjoy.
Serve in a Cone
If you’re feeling particularly nostalgic, put a scoop in a cone! It makes for a fun, handheld treat that’s great for summer gatherings.
At the end, remember to join our community on Pinterest and Facebook ! Happy ice cream making!
Nutritional Values of Sugar Free Blueberry Lavender Ice Cream Recipe
Knowing the nutritional content of your homemade ice cream can be crucial for health-conscious individuals. Here’s a general breakdown of the nutritional values per serving (based on a recipe serving about 4 people):
Calories
This ice cream is relatively low in calories, thanks to the sugar-free content. Each serving comes in at approximately 100 calories, making it a guilt-free indulgence!
Fats
The recipe is rich in healthy fats due to the coconut milk. Each serving contains about 7 grams of fat, which is beneficial for a balanced diet.
Sugar Content
Best of all, this ice cream is sugar-free, making it perfect for diabetics or anyone watching their sugar intake.
Nutrients
With added blueberries, you’re also receiving a boost of antioxidants, vitamins, and minerals, great for bolstering the immune system.
Conclusion
Making your own Sugar Free Blueberry Lavender Ice Cream is easier than it looks! With this recipe, you can customize flavors to suit your taste, and it’s cozy, classic, and beginner-approved. You don’t have to rely on store-bought ice creams filled with sugars and preservatives anymore.
So why not grab your ingredients, dust off your Ninja Creami, and blend up a delightful batch? I assure you it’ll become a staple in your summer routine!
If you enjoyed this recipe, do consider sharing it with friends and family. Try different twists, and don’t hesitate to leave a comment sharing your experience or variations! I can’t wait to hear how yours turns out.
FAQs About Sugar Free Blueberry Lavender Ice Cream Recipe
1. Can I use a different milk besides coconut?
Yes! Almond milk or cashew milk can work as substitutions, but the creaminess may differ.
2. Is the lavender taste strong in this recipe?
The lavender adds a subtle floral note, enhancing the blueberries. If you prefer, you can reduce the amount of lavender in the recipe.
3. How long does the ice cream last in the freezer?
If stored properly, it can last for about 2-3 weeks in the freezer, though it’s best consumed within a week for optimal texture.
4. Can I make this without a Ninja Creami?
Yes, you can blend the frozen mixture in a regular blender or let it thaw slightly and stir by hand, but the texture might not be as creamy.
5. Can I add other fruits to the recipe?
Absolutely! Feel free to experiment with strawberries, peaches, or even mango for a fruit twist! Just adjust the sugar levels based on the sweetness of the fruit.
Now that you have all the information and guidance needed, it’s time to get started on your ice cream adventure! I hope you find as much joy in making and eating this delightful dessert as I do. Enjoy!